I've never had much luck getting plants to grow. It's probably more accurate to say that I never really cared if they grew.
Things change.

A couple of years ago I read a story in the Chicago Reader about Earthboxes™.
Touted as the "garden of the future," the EarthBox is an innovative container gardening system invented by a Florida tomato farmer, Blake Whisenant, after a hurricane wiped out his crop in 1992. Two and a half feet long, 15 inches wide, and a foot tall, the EarthBox is self-watering and self-fertilizing, and its fans say that given enough sunlight even the brownest thumb can coax a crop from it. Plants grow in a sterile potting mix of peat moss and vermiculite and are nourished by a strip of fertilizer spread across the top. Water in a 2.2-gallon reservoir at the bottom of the box, which is filled through a tube jutting up from one corner, wicks up through the soil and into the roots, rather than seeping down from above, which means the box uses significantly less water than a conventional garden. A lightweight plastic cover--the shower cap--acts as mulch, keeping the soil moist and discouraging pests and weeds.
A decade ago Whisenant teamed up with Mickey Lynch, a plastics developer, to manufacture and market the EarthBox, which now retails for $37.95 through the company's Web site, earthbox.com. (A complete starter kit including potting mix and fertilizer is $59.95.) Made from recycled plastic, it's compact and portable, a boon for urban gardeners with limited open space. The self-contained design also prevents plants from pulling lead and other contaminants out of city soil. The reservoir doesn't need to be filled every day, and the box can be set at table height by anyone whose back or knees balk at ground-level horticulture. The Web site is stuffed with testimonials from happy gardeners ecstatic about record-breaking cucumber crops, four-foot-tall artichoke plants, and monster tomatoes. Whisenant says one season he harvested 137 pounds of tomatoes from a single box.
Obviously, there are some big ideas in those little Earthboxes®. After reading that they "more than double the yield of a conventional garden using less fertilizer, less water, and virtually no effort", we looked a little deeper and found that the results are scalable and they've got some numbers (PDF file) to back up the hype. With that in mind, we decided to make our own planters using cheap, readily available containers.
"Why Bother?"
Turns out it will take more than growing some tomatoes to change the world.
"350.org"
 One of the reasons we're doing this is to show other landless city residents how they can grow a little of their own food.
If you've got any questions after looking this over, send me an email. If I've got an answer or a link I'll pass it on. I found answers to most of my own questions by searching gardening forums, a few are listed at the end of this. If you're in Chicago and want to stop by and see this for yourself, send an email and I'll give you the address.
Where to start?
We put these planters on our roofs because it's the only place that gets enough sun. If you want to do the same, the first thing to do is to find out if your roof can handle the extra weight. A builder, architect, or engineer can give you the answer. Keep in mind that they work just as well on a deck, balcony, or the ground.
Once you understand how the original Earthbox® works you can use just about any combination of containers that does the same thing.
Here are the best plans for homemade sub-irrigated planters that I found:
This link (heads up - pdf), from Seattle Peak Oil, is a primer on making homemade planters using different types of containers.
At the end there is a planting guide taken from the Earthbox® site, along with some other helpful tips.
If you've got a bunch of 5 gallon plastic buckets, the double bucket design on pg 18-19 of the pdf works well. Heidi has step by step instructions here.
This videowalksruns you through the assembly process.
My friends Art and Heidi set up more than2050 of them on their roof.
The Design I used, but wished I hadn't
Here's the link.
In April, 2008 I replaced all the pvc piping in my existing boxes with a safer plastic. I had reservations about using pvc in the first place, see below under caveats for more.
What I Make Now - The 2 Tub Design
Here's the link
It's a lot easier to make and doesn't need any pvc.
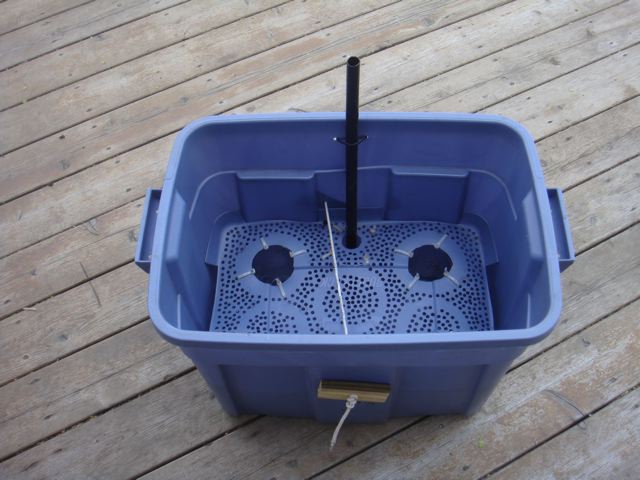
[The title is a little misleading. After reworking the scraps, I was able to make each box using one intact Rubbermaid container, and 1/3 of another one. In other words, I can make three finished planters from four containers. It turns out that a yogurt container, more on that in a bit, is exactly 1/3 of the height of the 18 gallon Rubbermaid container. Using nylon snap ties, I attached the previously cut out center of the lid to 1/3 of the cut up tub wall. This gives you a screen that's supported on the perimeter by the cut up tub wall. Then I attached the yogurt cups to support the center.
It helps if you're using a jigsaw.
]


 Instead of fish pond baskets, I re-used old 32 oz. yogurt containers to support the soil screen. I used two per rubbermaid tub, placed side by side, drilling the sides and bottom of the containers full of 1/4 inch holes before attaching them to the bottom third of a cut up rubbermaid tub.
If you don't have enough yogurt cups, the fish pond baskets needed for the 2 tub design can be found here.
Keep in mind that the height of the basket/yogurt cup determines the capacity of the water reservoir you're creating. You probably don't want one shorter than 5" unless you're going to have some kind of automatic watering system (more on that here).


One other thing to add --
In order to keep the container from spreading when it's full of potting mix, I've added a length of nylon rope anchored by two wood blocks. When the container spreads, gaps open up between the sides of the rubbermaid tub and the soil screen, allowing excess potting mix to drop into the water reservoir.
How much does it cost?
For the box, potting mix, fertilizer, trellis and watering system, the official Earthbox® is about $110/box. The comparable homemade version is a little less than $50/box, with the trellis accounting for almost half of that. Plus your time........ I think you could get the cost down by making a simpler trellis system.
Is it safe to use Plastic?
A couple of caveats:
These sound pretty technical, but after you read through the above links you'll know what I'm talking about.
The plastic, LDPE #4, in most of the homemade planters, i.e. Rubbermaid containers or 5 gallon buckets, isn't UV resistant like the official Earthbox®. You could paint them with a protective coating, but the only paint I found that will stick to Rubbermaid type plastic is expensive. Instead, I tried to protect the boxes by putting an oversized garbage bag over them, one that doubled as the mulch cover. It's only been a year, but so far, so good. Worst case, I'll have to buy a new tub (roughly $5).
Using PVC as the screen support - as I originally did in my planters - isquestionablea bad idea. I've asked several soil testing groups about pvc leaching into the soil, the consensus is that unless it's burned, rigid pvc is stable (though incredibly toxic to manufacture). It's the pliable pvc products containing plasticizers- things like i.v. drip bags and baby teething rings - that leach phthalates when heated. The resulting residue can cause havoc with the endocrine system. (I'm no expert. If you know about this stuff, I'd love to hear from you.) I've got plenty of links if you want them, though they're mostly inconclusive about using rigid pvc. Wikipedia says that CPVC is safe to use for drinking water supply lines, but no doubt about it, the stuff is nasty.
I replaced the 4" pvc pipe screen supports in the boxes I made with heavy duty plastic drinking cups.
Trellis
 I made the trellis support system out of pressure treated lumber and thin wall metal electrical pipe, clamps, and wire - all cheap and available at Home Depot. It takes some basic construction knowledge and tools to put them together. The idea was to use the weight of the tubs to support the trellis system without making holes in my roof. I also wanted it to be sturdy enough to keep up year round and not worry about it getting blown off the roof. If you weren't as concerned with it blowing over, 1" pvc would work just as well and is easier to work with.
I don't have any specific links to the trellis because I came up with that, though I was inspired by this photo. [dead link, 5.17.09]
You can buy the trellis netting here.
I did a post on building rooftop trellises, link here.
Automated Watering System
The Earthbox® company makes an automatic watering system, but it costs about $25/box and they only work with official Earthboxes®. (Because the Rubbermaid tubs are taller than the official box the valve won't reach to the bottom of the reservoir. ) "Donald 1800" is a frequent poster on the Earthbox® forum who has a great post full of pictures showing the official automated watering system at work. He doesn't think it's worth the time or expense to make your own automatic watering system.
This is a link to a basic DIY watering system.
I've got a better idea.
These planters should be self watering. As in hook up a hose and you're done watering. For the summer.
After thinking about how to do this, I decided that I wanted to work with one of the strengths of the SIP, its water reservoir, rather than adapt watering systems and techniques used for ordinary container or garden irrigation. While it's possible to run zoned drip lines or soaker hoses, they both have drawbacks.
This scheme is inexpensive, has no moving parts or timers, uses a minimum of water, is easy to set up and operate, and (almost always) works. I think I've got a way to make it foolproof, more on that in Part 2.
It's based on what, at first glance, seem like complicated ideas. However, most people intuitively understand what's going on, it just takes a few convoluted sentences to explain why it works.
I used lightweight potting mix as recommended by the Earthbox® planting guide. Each of my homemade planters used 2 cubic feet of mix (don't use potting soil, it doesn't wick water properly and your plants will die.) This is what we used for potting mix and fertilizer in 2007. We're thinking of changing it to Donald 1800's potting mix/fertilizer recipe .
Since peat is a dwindling resource, we're looking for something else to use in our potting mix. The most promising is coir, a product that comes from coconut shells. Another interesting lightweight growing medium is Gaia Soil. Because it's made from recycled polystyrene, it might be better for decorative rather than edible plants.
A few forums/blogs -
Yahoo Container Gardening Group
Inside Urban Green, "Modern methods of growing food, foliage or flowers for the millions of us who are not green thumbs".
Low Cost Container Gardening Ideas
The official Earthbox® Forum.
Container gardening at GardenWeb.
Los Angeles Eco-Village, "Demonstrating higher quality living patterns at a lower environmental impact"
If you do a Google search on the phrase Flickr Rooftop Vegetables, you'll find links to some related information that I've posted to different gardening and urban agriculture blogs. Some have helpful comments. It's what I've been telling people to Google if they want to find out more about this project.
......................
[Most of this is on my Flickr page. I also cross-posted it at Corrente.]
12 comments:
Thanks so much for posting all of this information on the web.
Earthbox's Forum is down, so your link to:
"We're thinking of changing it to Donald 1800's potting mix/fertilizer recipe." doesn't work.
Would you be able to post the potting mix recipe you're planning to use.
Thanks!
Jay
Boulder, Colorado
(formerly of Chicago)
Hi Jay,
Each of us are using a different mix.
I can tell you a little about what I'm using, and why.
First, Donald1800, the poster on the Earthbox forum incorporated a lot of organic materials, i.e. compost and other decomposing minerals, in his custom blend. He subsequently had a huge problem with fungus/mold of some kind. So much so that he had to throw everything out and start over. He believes that this is due to the closed environment of the earthbox systems, that things that would work in the ground behave differently in a container. I don't know myself. He posted this to the forum sometime in the last month. If it gets back online, check it out.
With that in mind, I'm reluctant to experiment too much. Here's what I do.
In each SIP, mine hold 2 cubic feet of growing media, I mix 1 cup of Espoma 5-3-3 Plant-tone and 1 cup of earthworm castings into all the media in the SIP. Then, in all the tomato planters I mix 2 cups of Espoma Garden Lime, "Derived from Dolomite"as it says on the package, to ward off blossom end rot.
Then it's 3 cups of my custom 10-10-10 organic fertilizer put on the top of the media.
I originally used Baccto Professional planting mix, which is about 85% peat, 10% vermiculite, and 5% perlite. There are also some undefined "balanced blend of major and minor nutrients" in the mix. I'm assuming they only last, at most, one season. That's why I mix a cup of 5-3-3 into each planter at the beginning of each season.
If I were to do it over, I'd make my own mix. Roughly 50% coir, 35% peat, 10% vermiculite, 5% perlite, with the Espoma 5-3-3 thrown in for nutrients.
Jay:
Quick note: the 5-gal bucket SIP (you mentioned in another post) requires roughly half of Bruce's tote SIP/earthbox ingredients.
Start with about one cubic foot of growing medium and cut everything else in half too.
H2
Hello, I'm trying to introduce this concept in France. Widely inspired by pictures and videos seen on the web, I have just started a blog last January.
As our culture is different, I slowly use examples that introduce subirrigation systems.
If you want to visit my blog and comment my experiments, I'll be glad to share more experiences.
Britt
http://plant-in.blogspot.com/
Do you think filling the yoghurt pots with expanded clay balls before adding the soil on top would slow the capillary action a little -- thus giving the tap roots a little time more to drink before the soil has sucked up all the water?
I am new to rooftop gardening and have easy access to a water line on my deck. Is there any advantage to using an SIP as opposed to a drip irrigation system?
Hi Marco,
Good question. My answer is that it depends on your circumstances. If water conservation is a priority I'd go with the SIP, since you have access to a good supply of water it might be easier to use drip irrigation.
The longer answer is that the studies done by the Earthbox people, who admittedly have an agenda, claim that you get larger yields by using sub-irrigation. This claim is also made by other experts such as Bob Hyland, of Inside Urban Green.
Good luck with your growing.
how about the roof you make for those plant, is it no roof like wild plant, or maybe use pvc roof as your roof so it safe from wind attack?
The markers for HORTOMALLAS vegetables should rancher as it decreases the transmission of infection and horticulture support netting or lengthen Los facility.
This is really nice blog. I feel happy to read this Carton corrugated boxes manufacturer blog.Thanks for sharing this information with us. SSIC is also one of the best company that manufacturer and supply the Carton corrugated boxes manufacturer in Pune.
Your site is amazing and your blogs are informative and knowledgeable to my websites.This is one of the best tips in my life.
white mulch
green mulch
plastic mulch
black mulch
protects from weeds
black mulch
Agricultural mulch
Mulch India
The same is the case with our Corrugated Boxes Wholesale as we offer wholesale discounts and deals. If you order our custom boxes in bulk or mass amount, we will offer amazing discounts and offs. Custom Corrugated boxes are made up of bio-degradable materials and natural resources that is why they do not harm the environment. This sort of material is 100% eco-accommodating hence is a great option to utilize as packaging material. As corrugated boxes are the desired ones for shipping and transportation due to their strength, so it is obvious that these Custom Printed Boxes are in higher demand by industries and brands.
Post a Comment