Wednesday, July 30, 2008
Now That's a Rooftop Garden
The Rooftop Garden Project: Liberating Spaces for Healthy Cities
We're doing this as individuals, with no institutional support, on our rooftops in Chicago. This video shows what's being done in the City of Montreal on a much larger scale.
They've opened up a whole new space for community gardening by making SIPs available to large numbers of people. By following their model, a Program isn't limited to existing, and oversubscribed, official Community Gardens, but can include balconies, decks, plazas and other common areas.
Inside Urban Green has more to say about the Montreal Project.
Is it just a matter of approaching the right politician(s), Hello Alderman Manny Flores!, to make this happen here?
Anyone else out there want to do this in Chicago?
Wednesday, July 23, 2008
Talking to PACHS Students
 This morning, a small group from nearby Dr. Pedro Albizu Campos Puerto Rican High School (PACHS) came to look at what we're doing on my roof.
 They were led by two teachers who thought our project would fit in nicely with the school's urban agriculture initiative. Michelle Torrise, one of those teachers, described the purpose of the visit this way:
We are hoping to raise awareness of the work being done at the high school and develop relationships with fellow urban farmers. There are several initiatives going on including the development of a social ecology/urban agriculture curriculum, the building of a rooftop greenhouse, and the creation of a community garden in Humboldt Park. Other projects include an after school programs, a student led recycling programs, community beautification projects, and a school wide initiative to fight obesity.
Here is a link to some pictures on Flickr from last year's summer program.
There were about 10 students and they asked some great questions. If I had to describe them with only one word, it would be curious.
And occasionally playful.

I wanted to tie in what we're doing with some of the program's goals. After a moment or two I forgot all about that and just starting talking. So my presentation wasn't all that polished, but I'd like to believe that was part of what made it bearable.
 I gave a little demonstration of how my automatic watering system for the SIPs works. From a post on the AWS:
These loops aren't pressurized. Instead water moves from the 5 gallon reservoir to the individual planters via the loops by atmospheric pressure. I'm sure there's a scientific principle behind this, probably discovered by Archimedes, but I don't know what it is. So I'm going to call it the "water-level principle". The expression "water seeks it's own level" is another way of putting it.
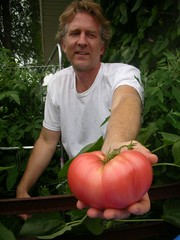
 This year I've been growing what I thought were Giant Grey Striped sunflowers. Last year I planted the seeds, from Victory Seed Co., and had a great yield. So I saved a head and dried it, thinking I'd use it to plant sunflowers everywhere this year. So far so good. I planted two SIPs on my roof with the saved seeds, plus there are about 10 volunteers cropping up on the side of my garage. You can eat the flowers, just before the heads open up is supposed to be the best time to harvest them.
 That's all changed. It seems that last years sunflowers were cross-pollinated by the unidentified rudbeckia that are growing on the side of the garage. (Or more likely from bees who had just come from a different type of sunflower. Thanks for the tip, Mr. BrownThumb.) This year the sunflowers have their usual thick, eight foot tall stalks, sturdy enough to support their giant (typically 12" diameter) sunflower heads. But because of the cross pollination they have 3 or 4 smaller flower heads coming out the sides of that stalk. Weird looking, possibly not edible, but worth talking about as part of an amateur Science Lesson.
I might have emphasized the wrong thing about the sunflowers. I'm guilty of telling you (and them) why I thought they were interesting. Some of the students liked them for a more obvious reason.
It's nice to eat the seeds directly from the plant.

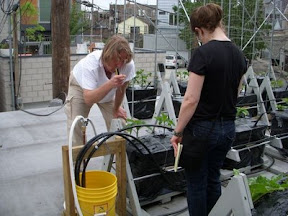
While I was talking to one half of the group, Heidi was giving a demonstration on how to make these planters to the other half. She showed them the kind that are on my roof, as seen in these pictures, and those that you make using 2 buckets. Somehow she found time to take all these pictures.
This student had more to say about the look of the building than what we planted.
In case he sees this, here's the story of how it got built along with a few more pictures. We were inspired by the work of Rick Joy and Luis Barragán (bio.)

I feel like they got something out of it, but that could just be the fog of wishful thinking settling in. We hope to keep working (?) with PACHS . And for anyone else out there who may be interested - Send them an email! It's a great program.
There are some ideas floating around in my head involving the parallels between Basque and Puerto Rican Nationalism, Andoni Aduriz's Mugaritz, and chicory. I can't pull them together though.
Maybe in a future post.
Monday, July 21, 2008
How to Make a Two Bucket Sub-Irrigated Planter (SIP)
This is a simple, easy-to-do project that will let you grow your own food wherever there’s enough sunlight--on your roof, balcony, back steps, driveway, or vacant lot next door. It doesn't take any special skill and the materials are all readily available. A diagram showing what's going on inside a SIP is here. The fundamentals are the same whether you use buckets, tubs, or Earthboxes.
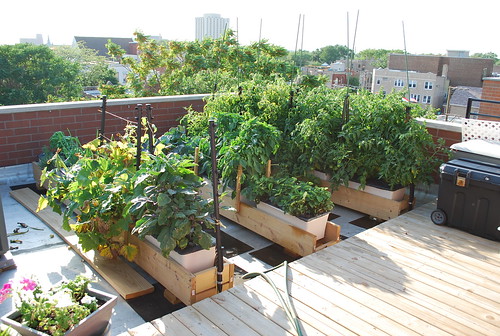
 Once you make one, it will produce beautiful food for years to come. You'll decide that one (or four, or six) isn't enough and you'll want to build lots more. This year we expanded with the ten extras at left.
Many of the photos here are from this second SIP run on the roof, and the pretty yellow pickle buckets are courtesy of Bruce's neighbor who drives for Chicago’s own Vienna Beef (Thanks, Rey! We owe you some tomatoes).
While these instructions are full of details, what you want (a healthy, productive plant) doesn't depend on following them exactly. It doesn't need to be perfect. The holes you cut can be raggedy and you'll still get pounds of tomatoes from one plant. Just try it. And if you get better results by doing it differently, we'd love to hear about it.
Materials and Tools Needed
View this quick video for a sense of how the whole thing comes together.
While it's obviously sped up, it helps to see one done before you try it yourself. Plus, we like the drums.
So now you're ready to make one.
This is the fun part. You get to drill lots of holes in one of the buckets (set one bucket aside and don't drill it):
Set the nestled buckets in front of a light source and note how tall your water reservoir is going to be. You need to measure the height of that reservoir. Transfer that measurement to the side of your plastic drinking cup, starting from the bottom. You should now have the height of the reservoir transfered to the side of your cup. Measure the diameter of the cup at that height and add 1/8". That's how big a hole you need to cut out of the bottom of your bucket.
 Turn the bucket over and mark the center. Drill a hole for the wicking cup in the center, as I'm doing here at right. If you don't have a hole saw, draw the proper diameter hole on the bucket and drill a series of quarter-inch starter holes around the perimeter of the hole you want to cut out. You should be able to get your snips or scissors in the starter holes and then cut out the larger hole for the plastic drinking cup.
 Measure the diameter of your watering tube. Add 1/8" and draw a circle of that diameter about 1" in from the outside edge of the bottom of the bucket. Cut out that hole using a hole saw or with your 1/4" bit and utility knife.
It doesn't matter if the edges are ragged or if there's a gap of a 1/4" or so around either the feed tube or the plastic cup/wicking chamber. You just want to keep the potting mix from falling into, and clogging up, your water reservoir.

Now drill 30 or so 1/4" holes, evenly spaced, around the bottom of the bucket. These are the holes that allow air to get to the bottom of the roots and also for roots to grow down into the reservoir.
You'll want to cut off one end of the feeding tube at a 45 degree angle so when it's sitting in the bucket it won't get clogged up.
Using your utility knife, make 4 vertical slits (evenly spaced, with one in every quadrant) in the sides of the plastic cup. Don't cut through the bottom or the lip of the cup, just the sides. After you fill the cup with wet potting mix (creating a "wick"), these cuts will let water travel from the reservoir up into the potting mix in the upper bucket.
Put the bucket that's full of holes inside the other untouched bucket. As you did earlier, hold the bucket set up to the light and visualize the water reservoir at bottom. This time you want to drill two 1/4" overflow holes, on opposite sides of the previously untouched outside bucket. You want the height of these holes to be about a quarter inch below the bottom of the inside bucket. This means the bottom of the soil bucket will always stay relatively dry, as excess water will run out the overflow holes instead of forcing the roots to stay permanently drenched.
And now you’re ready to plant.
With one bucket sitting inside the other, drop the angled end of the feed tube into the hole you drilled for it. Pack the plastic cup with wet potting mix and set it inside the large hole in the center. It doesn't matter if it sticks up into the potting mix chamber--it's going to get covered up with potting mix anyway.
Fill the soil chamber with lightly moistened potting mix, pressing down every so often so it’s fairly compacted before adding more mix on top. You may want to mix a half cup of organic fertilizer into the potting mix. If you’re growing tomatoes, mix a cup of hydrated lime into the top 6 inches of potting mix. Be sure you have completely filled the bucket with potting mix and pressed it down around the edges at the top. There should be no depression in the soil--rather, it should mound up just a bit at the top.
 Sometimes it’s easier to plant larger seedlings by filling the bucket three quarters full of potting mix, planting the seedling, and topping off the bucket with potting mix. Then add the fertilizer ring (see below) and place the plastic over the bucket, gently weaving the plant top and the watering tube through two slits you made in the plastic.
 Put one cup of fertilizer around the outside edge of the bucket, leaving as large a space of plain soil in the middle as possible. Put the plastic bag (or clear plastic, as shown here) over the top to keep the fertilizer dry, moisture from evaporating, and UV rays from eating the bucket. Secure with a ziptie or string, cut your hole or holes and you’re reading to plant a small seedling or seeds.
The bucket on the right is ready to be planted with Fin de Bagnol beans, from Seed Savers.
After you plant the seeds (or seedlings), you'll want to water it in from the top. This is the first and only time you'll top water. Pour some water on it to help get it started and ease the shock of transplant). From then on you'll water your bucket by using the fill tube.
You'll be able to see the water level in the reservoir if you look closely. When it gets low, fill it up until water comes out of the overflow holes. Don't worry, you can't overwater it. You can underwater it though, so every few days take a look at the reservoir. When your plants grow larger, you may have to water every day.
Here are a couple more links with tips on planting and growing to get you off to a good start.

 If you've got a bunch to do, grab a friend. It's just a bucket!


Look what you can grow
 Once you make one, it will produce beautiful food for years to come. You'll decide that one (or four, or six) isn't enough and you'll want to build lots more. This year we expanded with the ten extras at left.
Many of the photos here are from this second SIP run on the roof, and the pretty yellow pickle buckets are courtesy of Bruce's neighbor who drives for Chicago’s own Vienna Beef (Thanks, Rey! We owe you some tomatoes).
While these instructions are full of details, what you want (a healthy, productive plant) doesn't depend on following them exactly. It doesn't need to be perfect. The holes you cut can be raggedy and you'll still get pounds of tomatoes from one plant. Just try it. And if you get better results by doing it differently, we'd love to hear about it.
Materials and Tools Needed
Two 5-gallon food grade bucketsIf you've got hole saws it's far easier to cut the two big holes. If you don't have them, you'll just have to do a bit more work.
One 1" diameter watering tube, about 3" longer than the height of one of the buckets, made of safe(r) plastic, copper, or bamboo
One 16-oz or 24-oz safe plastic drinking cup
One 13-gallon plastic trash bag
One cubic foot potting mix (not soil)
Organic fertilizer (1.5 to 2 cups per bucket)
For tomatoes only, Hydrated lime (one cup per bucket mixed into top 6 inches of soil)
Electric or cordless drill1/43/8 inch drill bit
Box cutter/utility knife
Snips or heavy duty scissors
View this quick video for a sense of how the whole thing comes together.
While it's obviously sped up, it helps to see one done before you try it yourself. Plus, we like the drums.
So now you're ready to make one.
This is the fun part. You get to drill lots of holes in one of the buckets (set one bucket aside and don't drill it):
Because every combination of buckets and cups is slightly different, take a few simple measurements to figure out how big a hole to drill for the wicking chamber. Here's how to do that:
- a big hole that will receive the soil wicking cup
- a medium-size hole for the feeding tube
- about 30 quarter-inch drainage holes
Set the nestled buckets in front of a light source and note how tall your water reservoir is going to be. You need to measure the height of that reservoir. Transfer that measurement to the side of your plastic drinking cup, starting from the bottom. You should now have the height of the reservoir transfered to the side of your cup. Measure the diameter of the cup at that height and add 1/8". That's how big a hole you need to cut out of the bottom of your bucket.
 Turn the bucket over and mark the center. Drill a hole for the wicking cup in the center, as I'm doing here at right. If you don't have a hole saw, draw the proper diameter hole on the bucket and drill a series of quarter-inch starter holes around the perimeter of the hole you want to cut out. You should be able to get your snips or scissors in the starter holes and then cut out the larger hole for the plastic drinking cup.
 Measure the diameter of your watering tube. Add 1/8" and draw a circle of that diameter about 1" in from the outside edge of the bottom of the bucket. Cut out that hole using a hole saw or with your 1/4" bit and utility knife.
It doesn't matter if the edges are ragged or if there's a gap of a 1/4" or so around either the feed tube or the plastic cup/wicking chamber. You just want to keep the potting mix from falling into, and clogging up, your water reservoir.

Now drill 30 or so 1/4" holes, evenly spaced, around the bottom of the bucket. These are the holes that allow air to get to the bottom of the roots and also for roots to grow down into the reservoir.
You'll want to cut off one end of the feeding tube at a 45 degree angle so when it's sitting in the bucket it won't get clogged up.
Using your utility knife, make 4 vertical slits (evenly spaced, with one in every quadrant) in the sides of the plastic cup. Don't cut through the bottom or the lip of the cup, just the sides. After you fill the cup with wet potting mix (creating a "wick"), these cuts will let water travel from the reservoir up into the potting mix in the upper bucket.
Put the bucket that's full of holes inside the other untouched bucket. As you did earlier, hold the bucket set up to the light and visualize the water reservoir at bottom. This time you want to drill two 1/4" overflow holes, on opposite sides of the previously untouched outside bucket. You want the height of these holes to be about a quarter inch below the bottom of the inside bucket. This means the bottom of the soil bucket will always stay relatively dry, as excess water will run out the overflow holes instead of forcing the roots to stay permanently drenched.
And now you’re ready to plant.
With one bucket sitting inside the other, drop the angled end of the feed tube into the hole you drilled for it. Pack the plastic cup with wet potting mix and set it inside the large hole in the center. It doesn't matter if it sticks up into the potting mix chamber--it's going to get covered up with potting mix anyway.
Fill the soil chamber with lightly moistened potting mix, pressing down every so often so it’s fairly compacted before adding more mix on top. You may want to mix a half cup of organic fertilizer into the potting mix. If you’re growing tomatoes, mix a cup of hydrated lime into the top 6 inches of potting mix. Be sure you have completely filled the bucket with potting mix and pressed it down around the edges at the top. There should be no depression in the soil--rather, it should mound up just a bit at the top.
 Sometimes it’s easier to plant larger seedlings by filling the bucket three quarters full of potting mix, planting the seedling, and topping off the bucket with potting mix. Then add the fertilizer ring (see below) and place the plastic over the bucket, gently weaving the plant top and the watering tube through two slits you made in the plastic.
 Put one cup of fertilizer around the outside edge of the bucket, leaving as large a space of plain soil in the middle as possible. Put the plastic bag (or clear plastic, as shown here) over the top to keep the fertilizer dry, moisture from evaporating, and UV rays from eating the bucket. Secure with a ziptie or string, cut your hole or holes and you’re reading to plant a small seedling or seeds.
The bucket on the right is ready to be planted with Fin de Bagnol beans, from Seed Savers.
After you plant the seeds (or seedlings), you'll want to water it in from the top. This is the first and only time you'll top water. Pour some water on it to help get it started and ease the shock of transplant). From then on you'll water your bucket by using the fill tube.
You'll be able to see the water level in the reservoir if you look closely. When it gets low, fill it up until water comes out of the overflow holes. Don't worry, you can't overwater it. You can underwater it though, so every few days take a look at the reservoir. When your plants grow larger, you may have to water every day.
Here are a couple more links with tips on planting and growing to get you off to a good start.

 If you've got a bunch to do, grab a friend. It's just a bucket!

Look what you can grow
Sunday, July 20, 2008
Plants in Plastic
Gardening is natural. Wholesome, organic, healthy, pure,..........
Growing plants in plastic containers seems to stand all that on its head.
I still think it's a great idea.
 These planters let non-gardeners, like myself, get great results. I'd guess that most of my peers haven't thought about growing anything since they were in elementary school and started something from a seed as a science project. Sub-irrigated planters (SIPs) are perfect for them.
Around the world, large numbers of people are moving to cities, and at least here in Chicago, the Community Gardens that exist have long waiting lists. Why not offer those people the chance to grow something on their balcony or deck (or roof)?
The simple act of growing a little bit of your own food can lead a previously apolitical person to question any number of things: the subsidy program that is the lifeblood of agribusiness, how modern agriculture contributes to global warming and produces tainted food, the prevalence of chemicals (and yes, plastic, more on that in minute) in our lives, Energy Policy, air and water quality, how access to fresh fruits and vegetables is largely determined by race and class. And more.
Don't get me wrong. I love permaculture, vermicomposting, and the ideas of Wendell Berry, but I'm not there yet. Living in the center of a large city, most of it seems out of reach. And as I said earlier, I'm not alone.
So for now, that means I make compromises; one of the biggest is using plastic.
In building these SIPs, I learned about different kinds of plastic. Some are better (less bad?) than others. Before I started this whole project, my attitude towards it was something like "well, if PVC is good enough for potable water lines, how bad can it be?". I don't think there's any way to talk about this without sounding like a lunatic, especially with (to?) strangers. All I can say is go read the links and make up your own mind.
I suppose I should issue a disclaimer: This is a blog. I'm not an expert. These are my opinions, even if they're supported by Experts.
First up is this from the University of Pittsburgh Cancer Institute's Center for Environmental Oncology:
In assembling these planters, I've been avoiding #3, 6, and 7 whenever I can. It takes a little effort, but I don't want to be a guinea pig.
This story published November 24, 2007 in the Milwaukee Journal Sentinel points out just how bad things are. To put it bluntly, I don't believe any claims made by the Chemical Industry.
The reporter is starting to get some traction for her story in larger media outlets, CNN, PBS, etc. What I took away from it, at least as it relates to making SIPs, is that the regulatory process is broken, and that any sign of doubt that actually makes it through a series of carefully designed media filters, should be heard as a scream.
[update 5.16.09, Susanne Rust adds to her Journal-Sentinel story on the BPA Industry, here.]
[updated 1.25.10 - We're using Food Grade plastic in our SIPs. "Food grade plastic does not contain dyes or recycled plastic deemed harmful to humans."]
[4.17.10 - I made SIPs out of cedar, eliminating most of the plastic].
Growing plants in plastic containers seems to stand all that on its head.
I still think it's a great idea.
These planters let non-gardeners, like myself, get great results. I'd guess that most of my peers haven't thought about growing anything since they were in elementary school and started something from a seed as a science project. Sub-irrigated planters (SIPs) are perfect for them.Around the world, large numbers of people are moving to cities, and at least here in Chicago, the Community Gardens that exist have long waiting lists. Why not offer those people the chance to grow something on their balcony or deck (or roof)?
The simple act of growing a little bit of your own food can lead a previously apolitical person to question any number of things: the subsidy program that is the lifeblood of agribusiness, how modern agriculture contributes to global warming and produces tainted food, the prevalence of chemicals (and yes, plastic, more on that in minute) in our lives, Energy Policy, air and water quality, how access to fresh fruits and vegetables is largely determined by race and class. And more.
Don't get me wrong. I love permaculture, vermicomposting, and the ideas of Wendell Berry, but I'm not there yet. Living in the center of a large city, most of it seems out of reach. And as I said earlier, I'm not alone.
So for now, that means I make compromises; one of the biggest is using plastic.
In building these SIPs, I learned about different kinds of plastic. Some are better (less bad?) than others. Before I started this whole project, my attitude towards it was something like "well, if PVC is good enough for potable water lines, how bad can it be?". I don't think there's any way to talk about this without sounding like a lunatic, especially with (to?) strangers. All I can say is go read the links and make up your own mind.
I suppose I should issue a disclaimer: This is a blog. I'm not an expert. These are my opinions, even if they're supported by Experts.
First up is this from the University of Pittsburgh Cancer Institute's Center for Environmental Oncology:
- What do the numbers and triangles mean on the bottom of plastic containers?
- The numbers with the triangles surrounding them describe the type of plastic material, or resin, used to make the container. If you are asked to sort your plastic materials, use these numbers to determine if products are made out of plastics that your recycling center or curbside pick-up will collect. Generally, #1 (PETE) and #2 (HDPE) plastics are most often collected and recycled.
- PETE or PET (polyethylene terephthalate): used for most clear beverage bottles.
- HDPE (high density polyethylene): used for "cloudy" milk and water jugs, opaque food bottles.
- PVC or V (polyvinyl chloride): used in some cling wraps (especially commercial brands), some "soft" bottles.
- LDPE (low density polyethylene): used in food storage bags and some "soft" bottles.
- PP (polypropylene): used in rigid containers, including some baby bottles, and some cups and bowls.
- PS (polystyrene): used in foam "clam-shell"-type containers, meat and bakery trays, and in its rigid form, clear take-out containers, some plastic cutlery and cups.
- Other (usually polycarbonate): used in 5-gallon water bottles, some baby bottles, some metal can linings.
Are all plastics safe?
No.
You should avoid buying and using #3, #6, and #7.
#3 PVC (polyvinyl chloride, or vinyl): [edited 5.15.09, that link is dead, try this one instead.]
PVC is hazardous in all of its phases: manufacturing, the products themselves in the home, and in the disposal of it.
One of the most toxic plastics, PVC is often used to make food packaging and in the production of plumbing and construction materials. PVC is commonly used in teethers and soft squeeze toys for young children, beach balls, bath toys (some rubber duckies), and dolls. Check the product or label to see what number plastic has been used.
To soften PVC into these flexible forms, various toxic chemicals are added as "plasticizers." Traces of these chemicals, known as adipates and phthalates, can leak out of PVC into your food. Some phthalates have been linked to cancer, kidney and liver damage, harm to developing reproductive organs, and premature breast development in baby girls. Inhaling these chemicals can also worsen asthma in children.
Because it contains a variety of additives and lacks a uniform composition, PVC is far less recyclable than other plastics.
#6 PS (polystyrene):
#6 plastic may leach styrene into the food it touches. A recent study in Environmental Health Perspectives concluded that some styrene compounds leaching from food containers are estrogenic (meaning they can disrupt normal hormonal functioning).
Styrene is also considered a possible human carcinogen by the World Health Organization's International Agency for Research on Cancer.
#7 Other, most commonly PC (polycarbonate):
#7 polycarbonate may be able to release its primary building block, bisphenol A, another suspected hormone disruptor, into liquids and foods. Although several governments in Europe and North America currently hold polycarbonate tableware and food storage containers to be safe, this is a highly active area of research. Additionally, while category 7 most often refers to polycarbonate, it is actually a catchall "other" category, and it may not be possible to be sure just what it is. The Center for Environmental Oncology recommends avoiding these containers wherever possible.
This story published November 24, 2007 in the Milwaukee Journal Sentinel points out just how bad things are. To put it bluntly, I don't believe any claims made by the Chemical Industry.
A Journal Sentinel investigation found that the government has failed to regulate these chemicals, despite repeated promises to do so. The regulatory effort has been marked by wasted time, wasted money and influence from chemical manufacturers.
The newspaper reviewed more than 250 scientific studies written over the past 20 years; examined thousands of pages of regulatory documents and industry correspondence; and interviewed more than 100 scientists, physicians, and industry and government officials.
Among the findings:
• U.S. regulators promised a decade ago to screen more than 15,000 chemicals for their effects on the endocrine system. They've spent tens of millions of dollars on the testing program. As yet, not a single screen has been done.
• Dozens of chemicals the government wants to screen first have already been tested over and over, even while thousands of untested chemicals are waiting to be screened.
• By the time the government gets around to doing the testing, chances are the results will be outdated and inconclusive. The government's proposed tests lack new, more sensitive measures that would identify dangerous chemicals that older screens could miss.
• As the U.S. testing process remains grounded, hundreds of products have been banned in countries around the world. Children's products - including some baby toys and teething rings - outlawed as dangerous by the European Union, Japan and Canada, are available here without warning.
• Lacking any regulation in the U.S., it's impossible for consumers to know which products are made with the dangerous compounds. Many companies don't list chemicals known to disrupt the endocrine system on product labels.
The government's efforts have been "an abject failure, a disaster," said Philip Landrigan, a pediatrician and chairman of the department of community and preventive medicine at Mount Sinai School of Medicine in New York.
[update 5.16.09, Susanne Rust adds to her Journal-Sentinel story on the BPA Industry, here.]
[updated 1.25.10 - We're using Food Grade plastic in our SIPs. "Food grade plastic does not contain dyes or recycled plastic deemed harmful to humans."]
[4.17.10 - I made SIPs out of cedar, eliminating most of the plastic].
Friday, July 18, 2008
Half Way Through the First Year

2008 was my first year to seriously try to grow something out of a garden. I used a SIP (sub irrigated planter) because it seemed to be the best for my needs. I grew on my roof because that was the only available space. It is a learning year for me but I’d like to share with you my thoughts and some lessons learned at the half-way point.
1. Watch for pests and disease and take preventative measures. - I have the dates that my plants were affected on a calendar; you won't catch me napping again. This year, it included white flies on my tomatoes, powdery mildew on my zucchini and cucumbers, and mosquitoes. All are easily treated, especially if caught early enough.
2. Build a reliable staking / trellis system that can support the plants, act as a wind barrier for our Chicago windy springs, and give the plants something to climb on. This year I tried plastic stakes and twine for the tomatoes and it just wasn’t strong enough. The plastic bends and the twine will cut into the plants. I’ll need a sturdy material (metal or wood) in a cage-like set-up so I can shrink wrap the cages for damaging winds and have them strong enough to hold the plants as they grow.
3. Look at an automatic watering system (aws). I’ve watered every day, mostly twice a day. Although it takes five minutes, it would be difficult if I missed a day or two. Bruce has developed a very easy aws using a Hudson valve to regulate the water levels. He's had success so far and I think that I'll be looking in to it next year. More details can be found here.
4. Be diligent on timing of crops and rotating out for the next micro season. My lettuce was great in the spring, as was the broccoli but then it bolted and I was left figuring out what to do. I’ve since added a few more tomatoes and some bush beans and will try to swap out strawberries and zucchini for another round of broccoli and lettuce or spinach. I’ll know more next year about what to look for, timing and crop options.
5. Buy all of my supplies in the fall for the spring. Chicago does not have a good all-in-one center for urban gardening. I have to run to four different places for four different things and then have to drive to the suburbs for some others. Hydrated lime was a tough find this year as was mosquito pellets. I can order online but this city is big enough, there should be better options.
6. Start plants from seed. This year, due to ease of use and the fact that it was my first year, I bought starters from garden centers. It was okay but you can get better varieties from seed as well as varieties that are disease resistant and weather resistant.
7. Plant vegetables that will give you a high yield for the space. Onions and strawberries are really good but they haven’t yielded much. Tomatoes, peppers, lettuce, broccoli, zucchini, eggplant were really good. I’m hoping beans will be too.
8. Share the knowledge. When I started in the spring, I found very little about how to do any of this. There were lots of pictures and forums but conflicting advice and a general superiority complex from the traditional agriculture community. This blog will change that. We’re hoping that it will be not only informative but entertaining and timely.
We’re open to comments and ideas. Keep them coming. Thanks much.
Thursday, July 17, 2008
Automatic Watering of SIPs, Part 1
I think these planters should be self watering. As in hook up a hose and you're done watering. For the summer.
I knew I wanted to work with one of the strengths of the SIP, its water reservoir, rather than adapt watering systems and techniques used for ordinary container or garden irrigation. While it's possible to run zoned drip lines or soaker hoses, they both have drawbacks.
What I came up with is inexpensive, has no moving parts or timers, uses a minimum of water, is easy to set up and operate, and (almost always) works. I think I've got a way to make it foolproof, more on that in Part 2. It's based on what, at first glance, seem like complicated ideas. However, most people intuitively understand what's going on, it just takes a few convoluted sentences to explain why it works.
I'm hoping that this post will draw some constructive criticism that we can all benefit from.
Why Does It Work?
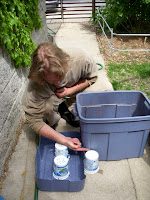
 The basic design has a central reservoir, in my case a 5 gallon food grade bucket (in yellow in the photo on the right), that's supplied by a drinking water hose (the white hose that comes from the bottom of the frame and splits off just above my right knee) and with its water level controlled by a Hudson valve (the valve is suspended in the bucket at the end of a 1/2" copper line). Out of this bucket run three (3) 1/2" black polyethylene tubing lines that loop around groups of planters. There are ten planters supplied by each loop. The individual planters are in turn fed by short lengths of 1/4" poly tubing that "tee" off of the 1/2" loops.
These loops aren't pressurized. Instead water moves from the 5 gallon reservoir to the individual planters via the loops by atmospheric pressure. I'm sure there's a scientific principle behind this, probably discovered by Archimedes, but I don't know what it is. So I'm going to call it the "water-level principle". The expression "water seeks it's own level" is another way of putting it.
Here's a diagram of a basic water level, typically used in construction projects.
It doesn't matter where the tubes go, as long as they're free of air bubbles, the height of the water in all three places (at the end of the dashed tube on the left, the reservoir in the middle, and at the end of the blue tube on the right) are all the same.
If you take this one step further and connect a series of reservoirs with tubes that are full of water, all the reservoirs will equalize at the same height.
 Take a look at this picture. Obviously you can't see the water moving, but when I remove water from one of the containers the remaining water is transferred via the tubes until each container has the same height of water in it. Conversely, if I add water to any or all of the containers, there will be a new higher (and equal) even height.
Now pull all this together.
I know that a Hudson valve can keep the height of the water in the reservoir at a specific level. Using the process shown in the second photo, I can hold each of the individual planter water chambers at that same fixed level. Each type of plant "drinks" water at a different rate; it doesn't matter. Once the water level in a specific planter goes below the level established in the main reservoir/bucket, the siphon tubes will take water from the neighboring planter in the loop. Each successive planter takes from the one "before" it in the loop until the water is eventually drawn from the main reservoir. The Hudson valve senses that the water has fallen below the predetermined height and it opens, allowing water from the hose to fill the reservoir back to the necessary level.
That's the theory. There are some tricks to get it working.
In Part 2 I'll talk a little about that.
[ed. - Here's the link to Part 2]
I knew I wanted to work with one of the strengths of the SIP, its water reservoir, rather than adapt watering systems and techniques used for ordinary container or garden irrigation. While it's possible to run zoned drip lines or soaker hoses, they both have drawbacks.
What I came up with is inexpensive, has no moving parts or timers, uses a minimum of water, is easy to set up and operate, and (almost always) works. I think I've got a way to make it foolproof, more on that in Part 2. It's based on what, at first glance, seem like complicated ideas. However, most people intuitively understand what's going on, it just takes a few convoluted sentences to explain why it works.
I'm hoping that this post will draw some constructive criticism that we can all benefit from.
Why Does It Work?
The basic design has a central reservoir, in my case a 5 gallon food grade bucket (in yellow in the photo on the right), that's supplied by a drinking water hose (the white hose that comes from the bottom of the frame and splits off just above my right knee) and with its water level controlled by a Hudson valve (the valve is suspended in the bucket at the end of a 1/2" copper line). Out of this bucket run three (3) 1/2" black polyethylene tubing lines that loop around groups of planters. There are ten planters supplied by each loop. The individual planters are in turn fed by short lengths of 1/4" poly tubing that "tee" off of the 1/2" loops.These loops aren't pressurized. Instead water moves from the 5 gallon reservoir to the individual planters via the loops by atmospheric pressure. I'm sure there's a scientific principle behind this, probably discovered by Archimedes, but I don't know what it is. So I'm going to call it the "water-level principle". The expression "water seeks it's own level" is another way of putting it.
Here's a diagram of a basic water level, typically used in construction projects.

It doesn't matter where the tubes go, as long as they're free of air bubbles, the height of the water in all three places (at the end of the dashed tube on the left, the reservoir in the middle, and at the end of the blue tube on the right) are all the same.
If you take this one step further and connect a series of reservoirs with tubes that are full of water, all the reservoirs will equalize at the same height.
Take a look at this picture. Obviously you can't see the water moving, but when I remove water from one of the containers the remaining water is transferred via the tubes until each container has the same height of water in it. Conversely, if I add water to any or all of the containers, there will be a new higher (and equal) even height.Now pull all this together.
I know that a Hudson valve can keep the height of the water in the reservoir at a specific level. Using the process shown in the second photo, I can hold each of the individual planter water chambers at that same fixed level. Each type of plant "drinks" water at a different rate; it doesn't matter. Once the water level in a specific planter goes below the level established in the main reservoir/bucket, the siphon tubes will take water from the neighboring planter in the loop. Each successive planter takes from the one "before" it in the loop until the water is eventually drawn from the main reservoir. The Hudson valve senses that the water has fallen below the predetermined height and it opens, allowing water from the hose to fill the reservoir back to the necessary level.
That's the theory. There are some tricks to get it working.
In Part 2 I'll talk a little about that.
[ed. - Here's the link to Part 2]
Monday, July 14, 2008
The Victory Garden of Tomorrow
We're Earnest and Sincere. Full of Good Intentions.
This can be a problem when you're trying to get people to change their behavior.
What to do?
Use propaganda. It works.

All images from Joe Wirtheim.
More of the series can be found here.
This can be a problem when you're trying to get people to change their behavior.
What to do?
Use propaganda. It works.


The Victory Garden of Tomorrow: Constructive values for the Future! Designed for Home, Work, or Community.
VGoT is a fake propaganda campaign for new, American home-front values. Inspiration for the campaign comes from events occuring a lifetime ago: the World's Fair of 1939, and the Garden for Victory campaign of 1944, and even the NASA's Apollo program of the 1960's.
Today, the campaign is represented by a series of hand screenprinted, limited edition posters made with acrylic inks and printed on synthetic, recyclable paper.

All images from Joe Wirtheim.
More of the series can be found here.
Saturday, July 12, 2008
It's not too late to start vegetables....
This is for anyone who stops by and ends up thinking "I'll do it!....... Next year".
There's plenty of time before the average first frost hits. And several plants do well even after that date. Here in Chicago it's October 14th, (or is it the 22nd?). I'll split the difference and say the 18th. Keep in mind it's weather, and these are averages.
Here's a chart that shows the last starting dates for different plant varieties, given a specific first frost date. If you start today, you have enough time to grow the following:
Bush beans, beets, broccoli, brussels sprouts, cabbage, carrots, cauliflower, chard, collards, cucumber, kale, lettuce, okra, peas, radishes, spinach, turnips.....
I'm sure there's more I've missed.
Google to the rescue:

We've had success with seeds from Victory Seed Company and Seed Savers. It's not rocket science. In fact you probably did it when you were a 2nd grader, which means you'll have no problem doing it now.
Here are two good links for more information on seed starting.
And if they don't have what you're looking for, this 300 page pdf The New Seed Starters Handbook should.
There's plenty of time before the average first frost hits. And several plants do well even after that date. Here in Chicago it's October 14th, (or is it the 22nd?). I'll split the difference and say the 18th. Keep in mind it's weather, and these are averages.
Here's a chart that shows the last starting dates for different plant varieties, given a specific first frost date. If you start today, you have enough time to grow the following:
Bush beans, beets, broccoli, brussels sprouts, cabbage, carrots, cauliflower, chard, collards, cucumber, kale, lettuce, okra, peas, radishes, spinach, turnips.....
I'm sure there's more I've missed.
Google to the rescue:
WHAT TO PLANT
In general, vegetables that grow best in cool weather are leafy greens, root crops and various members of the cabbage family. Beets, carrots, peas, chard, endive, kale, kohlrabi, lettuce, turnips, radishes, spinach, oriental vegetables like Chinese cabbage and bok choy and transplants of late cabbage, broccoli, cauliflower and Brussels sprouts may be planted in early August for fall harvesting.
My fall plantings of lettuce are healthier and better tasting than the ones I harvest in early spring. When I plant cauliflower in early spring, I get small, ricey discolored heads; when I plant for the fall, I cut snowy white heads with excellent flavor. I have similar good results with fall plantings of Brussels sprouts. When choosing cultivars for harvesting in the cooler temperatures and shorter days of fall, look for characteristics such as cold hardiness and quick maturity. Some cold hardy cultivars for broccoli are 'Waltham' and 'Green Valiant'; for Brussels sprouts there is 'Jade Cross'; for cabbage, 'Danish Ballhead' and 'Savoy Ace'; for cauliflower, 'Violet Queen' and 'Snow Crown'; for lettuce there are many choices: 'Black-Seeded Simpson,' 'Four Seasons,' 'Oak Leaf,' 'Salad Bowl'; for peas, there is 'Wando' and for carrots, 'Napoli.' Check seed catalogs for other recommended cold tolerant varieties.
Betty Jakum
Adams County Master Gardener
We've had success with seeds from Victory Seed Company and Seed Savers. It's not rocket science. In fact you probably did it when you were a 2nd grader, which means you'll have no problem doing it now.
Here are two good links for more information on seed starting.
And if they don't have what you're looking for, this 300 page pdf The New Seed Starters Handbook should.
Tomatoes: Mid-season fertilizing and pruning
 One of the claims made by the Earthbox™ people is that you only need to apply fertilizer once. I've never used the official product, but that hasn't been my experience with these homemade SIPs. There's just not enough juice to make it through the whole growing season. I've experimented with different N-P-K numbers, organic vs. petro-chem, and with adding more than the recommended amount; but both this year and last, the plants started to fade around July 10th.
[For 2009, I'm using a custom organic 10-10-10 fertilizer. More here]
I'm using 330 grams/12 oz (about 3 cups) of Bradfield Organics Tasty Tomato fertilizer (3-3-3), per box/two tomato plants, that I bought at Lake Street Landscaping (great source for city gardeners). Applied two times per growing season, once when I planted the seedlings and again halfway through the summer. Last year I followed the Official Directions and dosed them with a strip of Miracle Gro Organic (7-1-2) just once, when I planted. And then panicked in mid-July when the plants started to turn yellow. My improvised solution was to add water soluble Miracle Gro via the watering tubes for rest of the season. Really tedious.
This year I was ready when the plants started to quit. Obviously it's trickier to add fertilizer when there's a plant in and a plastic bag on, the box. Three days ago I made a vertical cut (up the side of each plastic bag that covers each planter) in line with the watering tube, from the bottom of the bag all the way up to the tube. Then I peeled back the bag, removed the old fertilizer strip, mixed in 90 grams/3 oz., (about 1/2 cup) of garden lime (to ward off potential blossom end rot) into the potting mix, added the new fertilizer, and then rolled the bag back over the sides of the box. I patched up the cut bag with a little duct tape.
I'm seeing new growth already.
Pruning
Before I replaced the fertilizer I pruned the tomatoes. I'd done it once before, about a month ago, and it was time to do it again.
From an article in Fine Gardening I learned this:
A properly pruned and supported single-stem tomato plant presents all of its leaves to the sun. Most of the sugar produced is directed to the developing fruit, since the only competition is a single growing tip. The result is large fruits that are steadily produced until frost. If more stems are allowed to develop, some of the precious sugar production is diverted from fruit to multiple growing tips. Fruit production, although slowed, never stops. The result is a nearly continuous supply of fruits throughout the season. In general, more stems means more but smaller fruits, which are produced increasingly later in the season. (This is much less applicable to determinate plants, due to their shortened growing season and better-defined fruiting period. Therefore, determinate plants require little pruning.)
RULE 1
Get plants off the ground.RULE 2
Give plants room.RULE 3
Never prune or tie plants when the leaves are wet.Pruning also affects plant health. The leaves of a pruned and supported plant dry off faster, so bacterial and fungal pathogens have less opportunity to spread. Soil is less liable to splash up onto staked plants. The bottom line: Upright plants have fewer problems with leaf spots and fruit rots because their leaves stay drier and free from pathogen-laden soil.
The way you choose to train and prune your tomato plants will affect how you space your plants, as well as the best method of support . There's no one right way to do it. Instead there are a few good patterns to follow.
The whole article is worth reading.
Here are a couple of other links on tomato pruning.
Tuesday, July 8, 2008
Lacinato Kale in Recycled Pop Bottle Planters
 We finally planted some of our recycled pop bottle planters, excellent fun to make and plant.
Bob Hyland has the instructions here. Thanks, Bob, for the nice clear visual guide.
These little sub-irrigated planters are a perfect way to recycle 2-liter pop bottles (which we had to beg from friends who drink soda) and pot up some of the left-over seedlings we didn't get into our bucket SIPs (sub irrigated planters) on the roof.
I mixed in a little of the organic fertilizer neighbor Bruce found locally. Hence the tea-colored water at the base.
Wouldn't a couple of these kale leaves be a nice addition to the tiny BLTs they're making over at Homegrown Evolution?
Monday, July 7, 2008
Uh-oh
 I just saw a few squash vine borers flying around my cucurbits. When this happened last year all the plants (eventually) died.
My half-hearted google searches didn't turn up anything useful, so I thought I'd throw it open to our vast readership.
What should I do?
Saturday, July 5, 2008
Ode to Squash Blossom
 the first blossom
like a trumpet
heralds zucchini
Seed: Botanical Interests Summer of Squash
Now in HD!
I rambled on for over an hour on camera. Talking about all the ways that food is tied into, well, everything. I'm glad that Mike Gebert, the one man production team, turned it into a watchable segment. The first part of the video profiles another local food person, Cassie Green of Green Grocer.
Sky Full of Bacon 01: How Local Can You Go? from Michael Gebert on Vimeo.
Sky Full of Bacon 01: How Local Can You Go? from Michael Gebert on Vimeo.
Local is a hot word in food these days. In How Local Can You Go? I visit two people who are taking different approaches to trying to bring local food into the mainstream in Chicago. Cassie Green runs a market in West Town called (what else?) Green Grocer, which features a lot of the producers who sell at Green City and other farmer’s markets. One of the knocks on local and organic food is that it’s the kind of thing only yuppies with extra money to spend can worry about, but the market that sustains something like local growing and eating usually starts with a cute little shop in a trendy neighborhood, and Cassie’s enthusiasm for the wonderful-looking food she sells is infectious.
Meanwhile, Bruce F. is a Wicker Park resident who read about Earthboxes in the Reader, and subsequently built about 30 DIY ones out of Rubbermaid tubs on his garage, as well as a Flickr page that tell you all about how and why you should do it too. He’s a thoughtful guy who really brings a lot of perspective to the broader issues surrounding the act of growing your own food in the city, in a way that kind of reminds you of John Cusack’s character in Say Anything.
The total podcast runs 19:39, though I’m pretty sure it doesn’t feel like it. As the season progresses I’ll check back with both Cassie and Bruce to see what else is growing, and include the updates in future podcasts.
Green Grocer
1420 W. Grand (just west of Ogden), Chicago
312.624.9508
Links for further exploration:
Green Grocer Chicago
Bruce’s Flickr page, and his Daily Kos diary
Reader article on Earthboxes
LTHForum thread on Earthboxes (with posts by both Bruce and myself)
Links to blogs and articles shown in the montage of locavore press toward the beginning:
Eat Local Challenge
Vital Information (essential Chicago locavore blog)
NY Times
Food & Wine
About Sky Full of Bacon
How (and Why) To Make a SIP*
*SIP = Sub-Irrigated Planter
I've never had much luck getting plants to grow. It's probably more accurate to say that I never really cared if they grew.
Things change.

A couple of years ago I read a story in the Chicago Reader about Earthboxes™.
Obviously, there are some big ideas in those little Earthboxes®. After reading that they "more than double the yield of a conventional garden using less fertilizer, less water, and virtually no effort", we looked a little deeper and found that the results are scalable and they've got some numbers (PDF file) to back up the hype. With that in mind, we decided to make our own planters using cheap, readily available containers.
"Why Bother?"
Turns out it will take more than growing some tomatoes to change the world.
"350.org"
 One of the reasons we're doing this is to show other landless city residents how they can grow a little of their own food.
Where to start?
We put these planters on our roofs because it's the only place that gets enough sun. If you want to do the same, the first thing to do is to find out if your roof can handle the extra weight. A builder, architect, or engineer can give you the answer. Keep in mind that they work just as well on a deck, balcony, or the ground.
Once you understand how the original Earthbox® works you can use just about any combination of containers that does the same thing.
Here are the best plans for homemade sub-irrigated planters that I found:
The Design I used, but wished I hadn't
What I Make Now - The 2 Tub Design
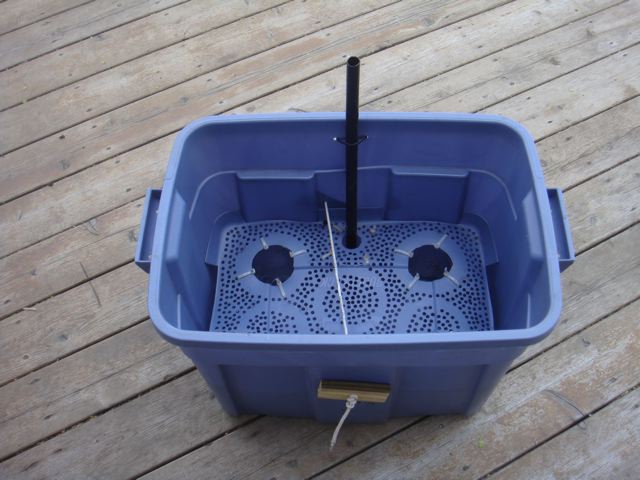
 Instead of fish pond baskets, I re-used old 32 oz. yogurt containers to support the soil screen. I used two per rubbermaid tub, placed side by side, drilling the sides and bottom of the containers full of 1/4 inch holes before attaching them to the bottom third of a cut up rubbermaid tub.
If you don't have enough yogurt cups, the fish pond baskets needed for the 2 tub design can be found here.
Keep in mind that the height of the basket/yogurt cup determines the capacity of the water reservoir you're creating. You probably don't want one shorter than 5" unless you're going to have some kind of automatic watering system (more on that here).


One other thing to add --
In order to keep the container from spreading when it's full of potting mix, I've added a length of nylon rope anchored by two wood blocks. When the container spreads, gaps open up between the sides of the rubbermaid tub and the soil screen, allowing excess potting mix to drop into the water reservoir.

How much does it cost?
Is it safe to use Plastic?
A couple of caveats:
These sound pretty technical, but after you read through the above links you'll know what I'm talking about.
Trellis
 I made the trellis support system out of pressure treated lumber and thin wall metal electrical pipe, clamps, and wire - all cheap and available at Home Depot. It takes some basic construction knowledge and tools to put them together. The idea was to use the weight of the tubs to support the trellis system without making holes in my roof. I also wanted it to be sturdy enough to keep up year round and not worry about it getting blown off the roof. If you weren't as concerned with it blowing over, 1" pvc would work just as well and is easier to work with.
I don't have any specific links to the trellis because I came up with that, though I was inspired by this photo. [dead link, 5.17.09]
You can buy the trellis netting here.
I did a post on building rooftop trellises, link here.
Automated Watering System
The Earthbox® company makes an automatic watering system, but it costs about $25/box and they only work with official Earthboxes®. (Because the Rubbermaid tubs are taller than the official box the valve won't reach to the bottom of the reservoir. ) "Donald 1800" is a frequent poster on the Earthbox® forum who has a great post full of pictures showing the official automated watering system at work. He doesn't think it's worth the time or expense to make your own automatic watering system.
This is a link to a basic DIY watering system.
I've got a better idea.
I used lightweight potting mix as recommended by the Earthbox® planting guide. Each of my homemade planters used 2 cubic feet of mix (don't use potting soil, it doesn't wick water properly and your plants will die.) This is what we used for potting mix and fertilizer in 2007. We're thinking of changing it to Donald 1800's potting mix/fertilizer recipe .
Since peat is a dwindling resource, we're looking for something else to use in our potting mix. The most promising is coir, a product that comes from coconut shells. Another interesting lightweight growing medium is Gaia Soil. Because it's made from recycled polystyrene, it might be better for decorative rather than edible plants.
A few forums/blogs -
Yahoo Container Gardening Group
Inside Urban Green, "Modern methods of growing food, foliage or flowers for the millions of us who are not green thumbs".
Low Cost Container Gardening Ideas
The official Earthbox® Forum.
Container gardening at GardenWeb.
Los Angeles Eco-Village, "Demonstrating higher quality living patterns at a lower environmental impact"
If you do a Google search on the phrase Flickr Rooftop Vegetables, you'll find links to some related information that I've posted to different gardening and urban agriculture blogs. Some have helpful comments. It's what I've been telling people to Google if they want to find out more about this project.
......................
[Most of this is on my Flickr page. I also cross-posted it at Corrente.]
I've never had much luck getting plants to grow. It's probably more accurate to say that I never really cared if they grew.
Things change.
A couple of years ago I read a story in the Chicago Reader about Earthboxes™.
Touted as the "garden of the future," the EarthBox is an innovative container gardening system invented by a Florida tomato farmer, Blake Whisenant, after a hurricane wiped out his crop in 1992. Two and a half feet long, 15 inches wide, and a foot tall, the EarthBox is self-watering and self-fertilizing, and its fans say that given enough sunlight even the brownest thumb can coax a crop from it. Plants grow in a sterile potting mix of peat moss and vermiculite and are nourished by a strip of fertilizer spread across the top. Water in a 2.2-gallon reservoir at the bottom of the box, which is filled through a tube jutting up from one corner, wicks up through the soil and into the roots, rather than seeping down from above, which means the box uses significantly less water than a conventional garden. A lightweight plastic cover--the shower cap--acts as mulch, keeping the soil moist and discouraging pests and weeds.
A decade ago Whisenant teamed up with Mickey Lynch, a plastics developer, to manufacture and market the EarthBox, which now retails for $37.95 through the company's Web site, earthbox.com. (A complete starter kit including potting mix and fertilizer is $59.95.) Made from recycled plastic, it's compact and portable, a boon for urban gardeners with limited open space. The self-contained design also prevents plants from pulling lead and other contaminants out of city soil. The reservoir doesn't need to be filled every day, and the box can be set at table height by anyone whose back or knees balk at ground-level horticulture. The Web site is stuffed with testimonials from happy gardeners ecstatic about record-breaking cucumber crops, four-foot-tall artichoke plants, and monster tomatoes. Whisenant says one season he harvested 137 pounds of tomatoes from a single box.
Obviously, there are some big ideas in those little Earthboxes®. After reading that they "more than double the yield of a conventional garden using less fertilizer, less water, and virtually no effort", we looked a little deeper and found that the results are scalable and they've got some numbers (PDF file) to back up the hype. With that in mind, we decided to make our own planters using cheap, readily available containers.
"Why Bother?"
Turns out it will take more than growing some tomatoes to change the world.
"350.org"
 One of the reasons we're doing this is to show other landless city residents how they can grow a little of their own food.
If you've got any questions after looking this over, send me an email. If I've got an answer or a link I'll pass it on. I found answers to most of my own questions by searching gardening forums, a few are listed at the end of this. If you're in Chicago and want to stop by and see this for yourself, send an email and I'll give you the address.
Where to start?
We put these planters on our roofs because it's the only place that gets enough sun. If you want to do the same, the first thing to do is to find out if your roof can handle the extra weight. A builder, architect, or engineer can give you the answer. Keep in mind that they work just as well on a deck, balcony, or the ground.
Once you understand how the original Earthbox® works you can use just about any combination of containers that does the same thing.
Here are the best plans for homemade sub-irrigated planters that I found:
This link (heads up - pdf), from Seattle Peak Oil, is a primer on making homemade planters using different types of containers.
At the end there is a planting guide taken from the Earthbox® site, along with some other helpful tips.
If you've got a bunch of 5 gallon plastic buckets, the double bucket design on pg 18-19 of the pdf works well. Heidi has step by step instructions here.
This videowalksruns you through the assembly process.
My friends Art and Heidi set up more than2050 of them on their roof.
The Design I used, but wished I hadn't
Here's the link.
In April, 2008 I replaced all the pvc piping in my existing boxes with a safer plastic. I had reservations about using pvc in the first place, see below under caveats for more.
What I Make Now - The 2 Tub Design
Here's the link
It's a lot easier to make and doesn't need any pvc.
[The title is a little misleading. After reworking the scraps, I was able to make each box using one intact Rubbermaid container, and 1/3 of another one. In other words, I can make three finished planters from four containers. It turns out that a yogurt container, more on that in a bit, is exactly 1/3 of the height of the 18 gallon Rubbermaid container. Using nylon snap ties, I attached the previously cut out center of the lid to 1/3 of the cut up tub wall. This gives you a screen that's supported on the perimeter by the cut up tub wall. Then I attached the yogurt cups to support the center.
It helps if you're using a jigsaw.
]


 Instead of fish pond baskets, I re-used old 32 oz. yogurt containers to support the soil screen. I used two per rubbermaid tub, placed side by side, drilling the sides and bottom of the containers full of 1/4 inch holes before attaching them to the bottom third of a cut up rubbermaid tub.
If you don't have enough yogurt cups, the fish pond baskets needed for the 2 tub design can be found here.
Keep in mind that the height of the basket/yogurt cup determines the capacity of the water reservoir you're creating. You probably don't want one shorter than 5" unless you're going to have some kind of automatic watering system (more on that here).


One other thing to add --
In order to keep the container from spreading when it's full of potting mix, I've added a length of nylon rope anchored by two wood blocks. When the container spreads, gaps open up between the sides of the rubbermaid tub and the soil screen, allowing excess potting mix to drop into the water reservoir.
How much does it cost?
For the box, potting mix, fertilizer, trellis and watering system, the official Earthbox® is about $110/box. The comparable homemade version is a little less than $50/box, with the trellis accounting for almost half of that. Plus your time........ I think you could get the cost down by making a simpler trellis system.
Is it safe to use Plastic?
A couple of caveats:
These sound pretty technical, but after you read through the above links you'll know what I'm talking about.
The plastic, LDPE #4, in most of the homemade planters, i.e. Rubbermaid containers or 5 gallon buckets, isn't UV resistant like the official Earthbox®. You could paint them with a protective coating, but the only paint I found that will stick to Rubbermaid type plastic is expensive. Instead, I tried to protect the boxes by putting an oversized garbage bag over them, one that doubled as the mulch cover. It's only been a year, but so far, so good. Worst case, I'll have to buy a new tub (roughly $5).
Using PVC as the screen support - as I originally did in my planters - isquestionablea bad idea. I've asked several soil testing groups about pvc leaching into the soil, the consensus is that unless it's burned, rigid pvc is stable (though incredibly toxic to manufacture). It's the pliable pvc products containing plasticizers- things like i.v. drip bags and baby teething rings - that leach phthalates when heated. The resulting residue can cause havoc with the endocrine system. (I'm no expert. If you know about this stuff, I'd love to hear from you.) I've got plenty of links if you want them, though they're mostly inconclusive about using rigid pvc. Wikipedia says that CPVC is safe to use for drinking water supply lines, but no doubt about it, the stuff is nasty.
I replaced the 4" pvc pipe screen supports in the boxes I made with heavy duty plastic drinking cups.
Trellis
 I made the trellis support system out of pressure treated lumber and thin wall metal electrical pipe, clamps, and wire - all cheap and available at Home Depot. It takes some basic construction knowledge and tools to put them together. The idea was to use the weight of the tubs to support the trellis system without making holes in my roof. I also wanted it to be sturdy enough to keep up year round and not worry about it getting blown off the roof. If you weren't as concerned with it blowing over, 1" pvc would work just as well and is easier to work with.
I don't have any specific links to the trellis because I came up with that, though I was inspired by this photo. [dead link, 5.17.09]
You can buy the trellis netting here.
I did a post on building rooftop trellises, link here.
Automated Watering System
The Earthbox® company makes an automatic watering system, but it costs about $25/box and they only work with official Earthboxes®. (Because the Rubbermaid tubs are taller than the official box the valve won't reach to the bottom of the reservoir. ) "Donald 1800" is a frequent poster on the Earthbox® forum who has a great post full of pictures showing the official automated watering system at work. He doesn't think it's worth the time or expense to make your own automatic watering system.
This is a link to a basic DIY watering system.
I've got a better idea.
These planters should be self watering. As in hook up a hose and you're done watering. For the summer.
After thinking about how to do this, I decided that I wanted to work with one of the strengths of the SIP, its water reservoir, rather than adapt watering systems and techniques used for ordinary container or garden irrigation. While it's possible to run zoned drip lines or soaker hoses, they both have drawbacks.
This scheme is inexpensive, has no moving parts or timers, uses a minimum of water, is easy to set up and operate, and (almost always) works. I think I've got a way to make it foolproof, more on that in Part 2.
It's based on what, at first glance, seem like complicated ideas. However, most people intuitively understand what's going on, it just takes a few convoluted sentences to explain why it works.
I used lightweight potting mix as recommended by the Earthbox® planting guide. Each of my homemade planters used 2 cubic feet of mix (don't use potting soil, it doesn't wick water properly and your plants will die.) This is what we used for potting mix and fertilizer in 2007. We're thinking of changing it to Donald 1800's potting mix/fertilizer recipe .
Since peat is a dwindling resource, we're looking for something else to use in our potting mix. The most promising is coir, a product that comes from coconut shells. Another interesting lightweight growing medium is Gaia Soil. Because it's made from recycled polystyrene, it might be better for decorative rather than edible plants.
A few forums/blogs -
Yahoo Container Gardening Group
Inside Urban Green, "Modern methods of growing food, foliage or flowers for the millions of us who are not green thumbs".
Low Cost Container Gardening Ideas
The official Earthbox® Forum.
Container gardening at GardenWeb.
Los Angeles Eco-Village, "Demonstrating higher quality living patterns at a lower environmental impact"
If you do a Google search on the phrase Flickr Rooftop Vegetables, you'll find links to some related information that I've posted to different gardening and urban agriculture blogs. Some have helpful comments. It's what I've been telling people to Google if they want to find out more about this project.
......................
[Most of this is on my Flickr page. I also cross-posted it at Corrente.]
Subscribe to:
Posts (Atom)