
Showing posts with label recipes. Show all posts
Showing posts with label recipes. Show all posts
Wednesday, September 18, 2013
Monday, July 19, 2010
Early Rooftop Eggplant and Tomatoes

Black Cherry are the first tomatoes to ripen on my roof.


Tomatillos will be ready soon.
I've also had a handful of eggplant ripen. Not having a camera handy, I cut and pasted these pics from google images.
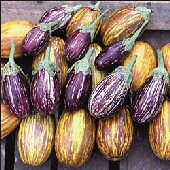
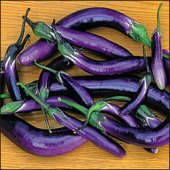
and Diamond.
Learning to cook what you grow is part of gardening. It's not that hard; like anything, it's practice, practice, practice. When I want to do more than simply sauté (blah!) eggplant, I usually reach for one of my Indian cookbooks. Though in this case, it's an Americanized version of an Indian recipe.
Hot, Sweet, and Sour Chickpeas with Eggplant
(Slightly adapted from Mark Bittman’s How to Cook Everything Vegetarian
Serves 4. Cooking time 45 min.
Ingredients:
- 1 or 2 medium eggplant, peeled and then shredded on box grater (This is key: the small pieces of eggplant melt into the liquid, forming a delicious, almost unidentifiable, sauce.)
- 1 or more cups of water
- 1 tablespoon peeled & grated ginger (or 1 tsp dried ginger)
- 1 or 2 hot fresh chilies, seeded and minced (or substitute red pepper flakes)
- 1 sprig fresh curry leaves, or a few dried (optional)
- 3 cups cooked chickpeas, with about 2 cups of cooking liquid (Or if you're desperate, two cans of chickpeas + 2 cups water).
- 1 tablespoon Sambar Powder (2 tsp ground coriander, 1/2 tsp ground fenugreek, 1/2 tsp mustard seeds) or curry powder
- 1 teaspoon ground turmeric
- Pinch of asafetida (optional)
- 2 tablespoons brown sugar
- 1 tablespoon tamarind paste or freshly squeezed lime juice to taste
- 8 oz. frozen peas (optional)
- salt and pepper to taste
- Chopped cilantro (for garnish)
- Chopped roasted peanuts (for garnish)
- Put eggplant, ginger, curry leaves (if using) and 1 cup of water in 4 quart saucepot and cook/simmer for 20-30 minutes, until eggplant is almost tender.
- Add the chickpeas with liquid, Samba/curry powder, turmeric, brown sugar, asafetia if you’re using, and lime juice/tamarind. Add enough water to make it slightly "soupy". Sprinkle with salt & pepper.
- Bring to a boil, and then reduce heat and simmer for about 15 minutes until thickened. Add peas, stir, cook for 4 min more. Taste and adjust seasoning/liquid.
- Garnish with cilantro and peanuts.
::::::
It wasn't pretty, but Spain won the World Cup. Nicely done!
Behind the flag, and looking down from my roof, is a tiny triangular piece of land owned by the city that's has been turned into a community garden; a process that I've been working on for the past 3 years. We just started planting 2 months ago, and now there are 13 individual plots as well as a common herb area, picnic table, and (future) compost bin.


[Click on image to enlarge.]
More on the community garden in another post.
Wednesday, November 11, 2009
Lemons: Preserved and Candied
What's the connection, if any, between rooftop gardening, my political droppings, and cooking? I'm guessing they feed off of each other in ways that don't need to be talked about here. Ultimately I find a kind of elegant beauty, a magic that isn't for sale, in cooking and growing food. I'm trying to apply that mojo to some of this world, so far with limited success.

When organic lemons went on sale at our local market, I decided to take on a couple of classic recipes: preserved lemons and candied lemon peel.
Making preserved lemons involves covering them with lemon juice--at least one lemon is juiced for every one that's preserved--so you're going to have a lot of leftover peel. This means it's a good idea to both preserve and candy around the same time. Rather than waste the rinds, just cut them off before you squeeze the juicing lemons, setting the pieces of rind aside to candy after you finish prepping the jar of preserved lemons. (You don't have to make candied peel. You can also zest--and freeze the result--the lemons before juicing.)
For the budget-minded, this is one of those things worth doing yourself. It'll cost you less than $2, and a little time and effort, to produce a preserved lemon. They sell for $7 apiece, plus shipping. The candied peel is $4/lb, in this case it's almost free.
What's all the fuss about? To use the copy from Zingerman's -
Preserved Lemons
I combined a couple of recipes: Mark Bittman's and 101 Cookbooks (she in turn copies Paula Wolfert).
The idea is to cover cut lemons with a mixture of salt, lemon juice, and spices and let this cure for at least 2 weeks. You end up with a salty, sour, and slightly sweet garnish that works with a wide variety of grains, vegetables, and stews. It's also great as a pizza topping.


After covering the lemons with juice, cover and shake the jar. Leave it out on the counter for 7 days, shaking once a day. Then put it in the refrigerator for at least 7 more days. Some recipes say shake it in the fridge, some not. It doesn't seem to make a difference.
This is a traditional North African process, and through trial and error became a way to store lemons long before refrigeration. I've read that the acidity in the lemons available to us could be different than those in traditional lemons, so there's a chance that mold might develop unless the finished product is refrigerated. Because of that, most recipes I've seen say to store the jar in the refrigerator.
Candied Lemon Peel
There are plenty of recipes online. This one isn't bad. Though it's for oranges, not lemons, the idea is the same. Keep a couple of things in mind.
It's a two step process.
First you boil the julienned peels in several changes of water.


H2--thanks for all these great pics, btw--found out that candied lemon rinds are even tastier frozen. Curiosity has it's rewards!
More lemon preserving/candying pictures -
For more on cooking, check out my posts on my food blog, Kitchen Exercises.
::::

When organic lemons went on sale at our local market, I decided to take on a couple of classic recipes: preserved lemons and candied lemon peel.
Making preserved lemons involves covering them with lemon juice--at least one lemon is juiced for every one that's preserved--so you're going to have a lot of leftover peel. This means it's a good idea to both preserve and candy around the same time. Rather than waste the rinds, just cut them off before you squeeze the juicing lemons, setting the pieces of rind aside to candy after you finish prepping the jar of preserved lemons. (You don't have to make candied peel. You can also zest--and freeze the result--the lemons before juicing.)
For the budget-minded, this is one of those things worth doing yourself. It'll cost you less than $2, and a little time and effort, to produce a preserved lemon. They sell for $7 apiece, plus shipping. The candied peel is $4/lb, in this case it's almost free.
What's all the fuss about? To use the copy from Zingerman's -
I’ve always liked the idea of preserved lemons. But I get stumped at the same place you probably do: what do you do with them? You can research recipes and get an idea but I wasn’t truly inspired until I ran into a friend who lived in North Africa.
“Oh! Preserved lemons! Can I have your jar? I love them in everything!”
Everything? Simple enough place to start.
I started trying what she suggested, adding them everywhere. Simply cut off a slice or two (return the rest of the lemon to the brine), dice and mix into your favorite sauces. Toss with salads. Garnish grilled meat. Add a slice to a martini. This is fun.
Preserved Lemons
I combined a couple of recipes: Mark Bittman's and 101 Cookbooks (she in turn copies Paula Wolfert).
The idea is to cover cut lemons with a mixture of salt, lemon juice, and spices and let this cure for at least 2 weeks. You end up with a salty, sour, and slightly sweet garnish that works with a wide variety of grains, vegetables, and stews. It's also great as a pizza topping.


After covering the lemons with juice, cover and shake the jar. Leave it out on the counter for 7 days, shaking once a day. Then put it in the refrigerator for at least 7 more days. Some recipes say shake it in the fridge, some not. It doesn't seem to make a difference.
This is a traditional North African process, and through trial and error became a way to store lemons long before refrigeration. I've read that the acidity in the lemons available to us could be different than those in traditional lemons, so there's a chance that mold might develop unless the finished product is refrigerated. Because of that, most recipes I've seen say to store the jar in the refrigerator.
Candied Lemon Peel
There are plenty of recipes online. This one isn't bad. Though it's for oranges, not lemons, the idea is the same. Keep a couple of things in mind.
It's a two step process.
First you boil the julienned peels in several changes of water.
The idea is to get rid of the bitterness, so taste after the third change and keep changing/boiling until it's gone. There shouldn't be any off flavors; it should just taste like bitter lemon. To get an idea of what you don't want, taste one after the first boil.The second is to braise the mellowed peels in simple syrup:
I use 2 parts sugar and 1 part water in my simple syrup. I make enough to just cover the boiled peels, and cook at a low boil for 20 min or so in a sauce pot. The lemon rinds will become slightly translucent, absorbing the sugar (?), and then they're done. Drain them in sieve and let cool a bit. If you put the final dusting of dry sugar on when they're too hot, you'll just have a gooey mess. Lay them out on parchment to dry as per the recipe.


H2--thanks for all these great pics, btw--found out that candied lemon rinds are even tastier frozen. Curiosity has it's rewards!
More lemon preserving/candying pictures -
For more on cooking, check out my posts on my food blog, Kitchen Exercises.
Tuesday, July 21, 2009
Eating What You Grow
It helps to be a bit of a cook. A curious one.
For the past month I've had a lot of chard and kale. It's a little overwhelming to be honest. "Eat your vegetables!" is connected to some unpleasant memories.
So................
 Looks good, but what is it?
Another clue -

Chard Pie.
What makes it come alive is the Turkish red pepper and walnut sauce, or Muhammara, that sits on top.
Another interesting prep for kale is slow roasting which results in something similar to nori. Both of which can be added to cucumber salad, btw.
Bittman's Vegetarian cookbook is a terrific resource for gardeners. Especially if you want some new ideas on what to do with all the (_________ ) you've grown.
In other garden news, most plants are growing nicely. One type that didn't do anything this year was broccoli and brussels sprouts. They grew full size but never set up complete heads; it's not a total loss, a friend of mine juices the leaves--they aren't bad sautèd either.


My rooftop tomatoes, peppers, and eggplants are setting up plenty of fruits. The beans, cukes, summer squash, and melons are only a couple of feet tall; I think all the cold weather we had earlier this summer set them back a bit.

It looks like I'm going to have plenty of extra produce in a month. Any ideas on what to do with it?
For the past month I've had a lot of chard and kale. It's a little overwhelming to be honest. "Eat your vegetables!" is connected to some unpleasant memories.
So................
 Looks good, but what is it?
Another clue -

Chard Pie.
What makes it come alive is the Turkish red pepper and walnut sauce, or Muhammara, that sits on top.
Another interesting prep for kale is slow roasting which results in something similar to nori. Both of which can be added to cucumber salad, btw.
Bittman's Vegetarian cookbook is a terrific resource for gardeners. Especially if you want some new ideas on what to do with all the (_________ ) you've grown.
::
In other garden news, most plants are growing nicely. One type that didn't do anything this year was broccoli and brussels sprouts. They grew full size but never set up complete heads; it's not a total loss, a friend of mine juices the leaves--they aren't bad sautèd either.


My rooftop tomatoes, peppers, and eggplants are setting up plenty of fruits. The beans, cukes, summer squash, and melons are only a couple of feet tall; I think all the cold weather we had earlier this summer set them back a bit.

Down on the ground, my potato box vines are about a foot above the top of their box but haven't flowered yet. Probably another month to go until they're ready.
The sunchokes, this pic is a month old, are about 6 feet tall right now.
It looks like I'm going to have plenty of extra produce in a month. Any ideas on what to do with it?
Monday, August 11, 2008
Grilled Vegetable Terrine
 Made of grilled vegetables, goat cheese, and vinaigrette, it's an elegant way to use what you've grown. And tastes even better than it looks.
If you've never made a terrine, this is a good place for a home cook with, say, intermediate kitchen skills to start. It uses late summer vegetables, ones that your SIPs are starting to deliver. It's also a very flexible recipe. The basic technique can be used with several different combinations of vegetables.
Before I get to the terrine, I'd like to point out that there are countless recipes, and sites devoted to them, that you could use to prepare your vegetables. With good ingredients, simple is better; a plate of sliced heirloom tomatoes drizzled with olive oil, sherry vinegar, basil, salt and pepper. Add a few slices of No-Knead Bread , some good cheese and a bottle of wine and it's a meal.
If you want some more ideas, I've found two of Mark Bittman's cookbooks to be helpful--Best Recipes in the World and How to Cook Everything - Vegetarian.
Grilled Vegetable Terrine
Adapted from Michael Ruhlman's Charcuterie and this recipe on Epicurious.
2 eggplant (roughly 2 pounds), peeled and sliced lengthwise into 1/4" slices
2 zucchini (roughly 1 pound), sliced lengthwise into 1/4" slices
2 yellow squash (roughly 1 pound), sliced lengthwise into 1/4" slices
Olive oil to brush on the above prior to grilling, (or broiling)
Salt and pepper
2 or 3 sweet peppers, roasted, peeled, seeded, and cut into strips
4 or 5 oven dried tomatoes, (click here for more on this technique), or sun-dried tomatoes
8 oz. goat cheese, softened to room temp.
1/2 c. of your favorite vinaigrette
1 1/2 Tablespoons water
1 teaspoon powdered gelatin
A narrow terrine pan, 10"x3"x3". If you have a different size you'll need to adjust the quantity of your ingredients. Also, any mold wider than three inches might cause the finished product to sag in the middle.
Mandoline, optional but makes things a lot easier
Plastic wrap
Pastry brush
Piece of cardboard cut to fit the top of the terrine pan
2 one pound cans, used to weigh down the terrine while it sets overnight
It takes about an hour of prep time, plus it needs to chill overnight
Yield: 8 to 10 appetizer portions

Slice the first three vegetables as uniformly as you can, a mandoline works best. Brush with oil, season with salt and pepper. Grill over medium heat until tender, turning just once so you get nice grill marks. Transfer to a plate to cool.
Before you start putting the terrine together, taste each of the components. If you don't like anything, change it now. It won't magically improve after being refrigerated overnight in a mold.
Put the water in a saucepan and sprinkle the gelatin over it. Once the gelatin is absorbed (blooms), put the pan over low heat until it's dissolved. Add it to 1/4 cup of the vinaigrette and keep it warm so it doesn't start to set up while you assemble the terrine. Putting the cup of vinaigrette into a slightly larger bowl of warm water does the trick.
Line the terrine with plastic wrap. You want enough overhang, (about 3 inches, on the long sides) so you can fold it over on the top of the finished terrine. Wetting the inside of the mold before you put in the plastic will make the plastic stick in the corners. Put a layer of eggplant
 slices in the mold first. Put them in crosswise, with the end of each piece starting at the centerline of the bottom of the mold and running up, and over, the side by an inch or two.
Keep in mind that the first layer you put down is going to be the "top" of the finished terrine, so put the pieces down with very little overlap. And that you're going to be serving a cross section of whatever you put inside the mold.
Lightly brush the eggplant with vinaigrette. You might have enough eggplant to put down two layers, overlap the joints where possible. After each layer brush with vinaigrette, it's the glue that holds the whole thing together. Repeat with the zucchini and yellow squash, remembering to put vinaigrette between each. Lay the strips of pepper in the mold and brush with vinaigrette. Gently press the goat cheese into the mold, creating an even layer and brush it with vinaigrette. Lay the tomatoes on top of the cheese, again brushing with vinaigrette. Fold the eggplant and squash flaps on top of the tomatoes, brush the top with the remaining vinaigrette. Pull the plastic up over the top and seal the terrine. Push down on the finished terrine using a little bit of pressure. You want to eliminate any voids and create a fairly solid block of vegetables. Put the cardboard cutout on top of the plastic you just sealed. Refrigerate overnight with the two weights on top.
Take it out of the fridge about a half hour before serving. Flip it over on to a cutting board, remove the plastic, turn it right side up (what was the bottom of the mold is the finished top of the terrine) and cut it into 1/2" slices. You'll get a clean slice if you use a thin bladed knife and pull it toward you with a long stroke rather than sawing back and forth. Clean off the knife in a tall glass of hot water as needed. Serve each piece with a little of the reserved vinaigrette on the side.
Try this recipe using different vegetables: carrots, mushrooms, leeks, onions, or fennel. Or boil, and shock in an ice water bath, some chard or kale to use as the outer layer instead of eggplant. You can play around with whatever combinations taste and look good. I wonder if I could make it a truly vegetarian dish by substituting agar for the gelatin? I bet someone at Ideas in Food or Playing with Fire and Water could tell me.
Rulhman's Charcuterie is discussed here on eGullet. Now that you're familiar with the basic technique, put it to use by making other terrines and patés.
Subscribe to:
Comments (Atom)