Showing posts with label AWS. Show all posts

Thursday, July 16, 2009

An Automatic Watering System Saved My Garden


Water is vital to a garden. Too much or too little water can affect your plants considerably. This is one of the great advantages of SIPs (sub-irrigated planters). The water variable is pretty much taken care of – as long as the water reservoir stays full and the potting mix does not dry out, your plants get just the amount of water they require.

This theory is all well and good if you’re around to fill the water reservoir. In the summer heat, large plants can easily use an entire reservoir of water, sometimes two. If you plan to travel at all; you’ll need a back-up plan.

Some people use irrigation drip methods, timers, or even a Hudson valve in a central water reservoir. All of these applications can work and I looked into them for my system but fortunately, Earthbox took away some of the guessing and work with their proprietary system.

Here’s where the Earthbox’s Automatic Watering System (AWS) saved my garden. I installed it a few weeks before two back to back weeks of travel – one for personal and one for work. I knew I wasn’t going to be around and needed something to get water to my plants.

I have 12 boxes and Earthbox sells a 12 box kit for $160.00. Seems a little expensive but I took in account trying to piece something together and the time it would take and thought it was well worth the price. The kit includes one regulator, 12 sensors with fill tubes, eleven black t-connectors, one white t-connector, two reducers, 100 feet of ¼ inch tubing, and 25 feet of 1/8 inch tubing. The instructions were pretty minimal but it was easy enough to figure out. This system is expandable to up to 30 boxes.

First, I installed a splitter on my water spigot so that I could have a dedicated line to the garden. I used a 25 foot RV hose, which is safe for potable water, and attached the regulator to it. I made sure to raise the regulator so that it is higher than the sensors on the boxes (picture).

Then, I ran the ¼ inch tubing along my boxes, cutting wherever I needed a break and installing a black t-connector. Then I connected the 1/8 tubing from the t-connector to the sensor that sits in the fill tube. The sensor works on pressure. If the tube is in the water, it’s happy. The moment the water level drops, the circular sensor on the top of the fill tube drips water into the box to the desired level. It’s that easy.

One thing I learned along the way was that you should use hot water to soak the tubing before attempting to install t-connectors. The hot water softens the plastic and allows you to fit the tubing over the barbed part of the connector. Once connected, the tubing cools and shrinks over the connector, forming a water tight seal. The instructions recommended oil or petroleum jelly but I would recommend against that since the ends could end up being too slippery to work with.

It works great and I don’t have to worry a bit about over or under watering, especially when I’m out of town. Another added benefit is that you won’t waste one drop of water. How’s that for conservation?

Sunday, March 15, 2009

Automatic Watering of SIPs, Part 2

Prompted by a comment from Publius, I decided to follow up on my first post from last summer. Fair enough: I did call it Automatic Watering of SIPs, Part 1, which at least suggests I had more to say on the subject.

Problem is I'm not sure what to write. When I put up Part 1, I thought that I'd follow it with a list of all the "tricks" that I'd discovered along the way. There really aren't that many.

I talked a little bit about this in my response to Kathy last summer. Purging the lines of air bubbles is the hard part.


Here's how I do it.

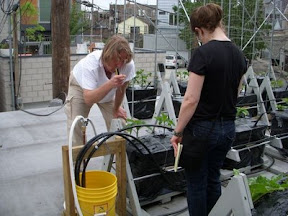
First, fill the main reservoir--the yellow bucket in the picture-- high enough to let you gently push the connection between the hose and the siphon/supply line below the water level in the reservoir. In practical terms this means 3/4 full. Next, fill up all the SIP reservoirs, one at a time, with a hose. Now, if you attach a hose to the beginning--where the Hudson valve is suspended--of the one of the black siphon lines , open the other end of the siphon/supply line, and turn the hose on, you'll force out all the air with water. Once a full stream of water is coming out the end of the open siphon tube/supply line, abruptly close the open end of the line. Then, making sure that water is coming out of the end of each 1/4" whip, put each of the 1/4" lines into its respective SIP fill tube.

Lower the hose/siphon supply tube connection below the surface of the reservoir. Slowly unscrew the hose from the supply line, being careful not to let the hose kink, while the water is still running through the hose.

Now that all the individual reservoirs are linked via siphon tubes, you only need to control the height of the water in the main reservoir. Figure out the right height for your Hudson valve and you're done.


Last year I used a 5 gallon bucket as my reservoir. It has a relatively small surface area, making it hard to submerge the hose/siphon tube connection below the water level in the bucket without kinking the hose. I found out that this causes the water to stop, briefly, and introduces air bubbles. Not what you want.

To make it easier, this year I'm going to use a longer, flatter reservoir. Probably a 14 gallon Rubbermaid tote. This will let me lower the connection between the siphon tube and the hose below the waterline without any hose kinks/air bubbles.

Whenever the system isn't primed, it stops. You'll see the plants droop, and you know it's time to flush it out and get rid of air bubbles. That happened about once a month last summer and I'm not sure why it did. It might be the fill tube that goes down into each SIP is moving around too much. Or the 1/4" whip that goes into each tube gets pushed/bumped and no longer sits in the water reservoir . As a safeguard I'm trying to figure out a way to be able to see the level of water in each tub. I might put a clear vertical cylinder in the middle of each siphon line, mimicking another sip in the loop. That way I could quickly tell if it's gone off.

Any ideas on what else I could do?

There are (at least) a couple of limits to what I'm doing. The first is that the SIPs need to be on roughly the same level. In my case, since my individual SIPs have reservoirs 5" tall, that's the maximum height that can separate the highest and lowest SIP--on my slightly sloped roof--being regulated by one Hudson valve. The second thing is about the priming process. It determines how you lay out your piping system.

I found that you need to restrict the number of SIPs on each siphon line to a maximum of 12. The reason for this is that at some point there's not enough water coming out of the hose to fill the 1/2" main line and all the 1/4" whips that go to each SIP at the same time. And that's the only way to get rid of all the air bubbles: fill the entire section of siphon tube with water. Basic math can help here. The total cross sectional area of all the whips can't be greater than the cross sectional area of the 1/2" main line. Due to frictional losses, the area of the whips should be less. How much I don't know. Trial and error or a clever engineer could give the answer.

All this is by way of explaining why there are three black 1/2" polyethylene lines coming out of the yellow bucket in the photo above. Each of those lines runs in a loop around 10 SIPs. Since I have 30 planters on my roof, I have 3 main supply/siphon lines.

Guess I did have something to say.

Thanks Publius.

Thursday, July 17, 2008

Automatic Watering of SIPs, Part 1

I think these planters should be self watering. As in hook up a hose and you're done watering. For the summer.

I knew I wanted to work with one of the strengths of the SIP, its water reservoir, rather than adapt watering systems and techniques used for ordinary container or garden irrigation. While it's possible to run zoned drip lines or soaker hoses, they both have drawbacks.

What I came up with is inexpensive, has no moving parts or timers, uses a minimum of water, is easy to set up and operate, and (almost always) works. I think I've got a way to make it foolproof, more on that in Part 2. It's based on what, at first glance, seem like complicated ideas. However, most people intuitively understand what's going on, it just takes a few convoluted sentences to explain why it works.

I'm hoping that this post will draw some constructive criticism that we can all benefit from.


Why Does It Work?

The basic design has a central reservoir, in my case a 5 gallon food grade bucket (in yellow in the photo on the right), that's supplied by a drinking water hose (the white hose that comes from the bottom of the frame and splits off just above my right knee) and with its water level controlled by a Hudson valve (the valve is suspended in the bucket at the end of a 1/2" copper line). Out of this bucket run three (3) 1/2" black polyethylene tubing lines that loop around groups of planters. There are ten planters supplied by each loop. The individual planters are in turn fed by short lengths of 1/4" poly tubing that "tee" off of the 1/2" loops.

These loops aren't pressurized. Instead water moves from the 5 gallon reservoir to the individual planters via the loops by atmospheric pressure. I'm sure there's a scientific principle behind this, probably discovered by Archimedes, but I don't know what it is. So I'm going to call it the "water-level principle". The expression "water seeks it's own level" is another way of putting it.

Here's a diagram of a basic water level, typically used in construction projects.

It doesn't matter where the tubes go, as long as they're free of air bubbles, the height of the water in all three places (at the end of the dashed tube on the left, the reservoir in the middle, and at the end of the blue tube on the right) are all the same.

If you take this one step further and connect a series of reservoirs with tubes that are full of water, all the reservoirs will equalize at the same height.

Take a look at this picture. Obviously you can't see the water moving, but when I remove water from one of the containers the remaining water is transferred via the tubes until each container has the same height of water in it. Conversely, if I add water to any or all of the containers, there will be a new higher (and equal) even height.

Now pull all this together.

I know that a Hudson valve can keep the height of the water in the reservoir at a specific level. Using the process shown in the second photo, I can hold each of the individual planter water chambers at that same fixed level. Each type of plant "drinks" water at a different rate; it doesn't matter. Once the water level in a specific planter goes below the level established in the main reservoir/bucket, the siphon tubes will take water from the neighboring planter in the loop. Each successive planter takes from the one "before" it in the loop until the water is eventually drawn from the main reservoir. The Hudson valve senses that the water has fallen below the predetermined height and it opens, allowing water from the hose to fill the reservoir back to the necessary level.

That's the theory. There are some tricks to get it working.


In Part 2 I'll talk a little about that.

[ed. - Here's the link to Part 2]