Saturday, March 31, 2012

Candied Orange Peels

This time of year organic oranges are cheap. It's easy enough to use up the "good" part of the orange, but what to do with all that peel?


It's a two step process.

First you boil the julienned peels (which include the pith) in several changes of water.  The idea is to get rid of the bitterness, so taste after the third change and keep changing/boiling until it's gone. There shouldn't be any off flavors; it should just taste like a bitter orange. To get an idea of what you don't want, taste one after the first boil.

The second is to braise the mellowed peels in simple syrup:
I use 1 part sugar and 1 part water in my simple syrup. I make enough to just cover the boiled peels, and cook at a low boil for 20 min or so in a sauce pot. The orange rinds will become slightly translucent, absorbing the sugar (?), and then they're done. Drain them in sieve and let cool a bit. If you put the final dusting of dry sugar on when they're too hot, you'll just have a gooey mess. Lay them out on wax paper to dry as per the recipe.

The final step is to dip them in melted chocolate.  Bitter is best, plenty of sugar in the peel at this point, though white chocolate is a nice twist.


One use for the interior of the oranges is to make a simple salad.  Supreme, or section the oranges, removing all traces of membrane.  Toss with minced scallions, toasted walnuts, ground cumin, and cayenne.

I wrote about preserved and candied lemons a couple of years ago, linked here.

Wednesday, March 28, 2012

When Life Gives You Mint...

...make mojitos.
 A profusion of mint appeared 
during Chicago's nine days of non-springtime temps in the mid-80s

If you have neighbors who grow things, ask if they have mint to share. It grows like gangbusters and many gardeners plant it into the ground in a pot so its roots don't spread. Me? Well, let's just say I always have plenty for mojitos, for neighbors who want to make mojitos, and for cutting in giant armfuls for the house.

Mojitos are easy and fun
Pluck leaves from stems, wash well, and toss into a bowl. Add a little sugar (you can always add more later) and muddle the leaves to release their essential oil.

Add some rum, Appleton Jamaican here--why not? Figure a couple generous shots per drink or follow the recipe link below.

Squeeze in the juice of a lemon or lime. Stir, cover, and let it steep for a couple hours.
Then strain the liquid, pressing down and squeezing the limp mint to release all its juice.

Pour the mint-rum-lemon over ice and top with soda water, garnishing with a mint sprig.

That'll make you smile

My toss-together recipe based on this one.

Tuesday, March 27, 2012

Mustard Green Spring Harvest


These mustard greens were planted last fall. I overwintered them by covering the hoops with Agribon, a frost fabric and 6 mil plastic. Yesterday I uncovered them and got the best Easter present ever!

 
Mustard Green Pesto 
Recipe from Bon Appetit

Ingredients:
1/2 cup plus 1/3 cup olive oil
1/4 cup pecans
2 garlic cloves, peeled, quartered
2 tablespoons balsamic vinegar
1/4 cup grated Parmesan cheese 
3 cups (loosely packed) coarsely chopped mustard greens

How to:
 

Blend 1/2 cup oil, pecans, and garlic in processor until finely chopped. Add vinegar, then Parmesan; process to blend. Add mustard greens alternately with remaining 1/3 cup oil in 2 additions each; puree until almost smooth. Season pesto with salt and pepper. Transfer to small bowl. DO AHEAD Can be made 6 hours ahead. Cover; chill. Let stand at room temperature 1 hour before using.

Sunday, March 25, 2012

Sub-Irrigated Salad Bowl Planter: How To Make One

Sub irrigation=watered from the bottom

Little Green Girl makes 2-liter SIPs (sub-irrigated planters) and you can apply the same concept to any watertight vessel, in this case an old wooden salad bowl. Check out how easy...

1) Make water+oxygen reservoir out of recycled drink bottleUse a basic soldering iron (best $12 you'll ever spend at Radio Shack) or hot nail to melt holes all over the bottle. Then melt a hole in one of the bottle's ends and insert a short piece of plastic drinking straw. This is the water overflow tube.

2) Make a fill tube by using a utility knife to cut an X in the bottle and inserting a piece of tubing like this...
...or cut another small drink bottle in half and insert as we've done below. This is where you'll add water. Note the same sub irrigation principle below, taking place in a recycled spinach box--more on this in a future post.

3) Put a hole in that bowl. We used a drill. You could also burn a hole. Make it big enough so the overflow straw/tube fits through it.


4) Thread the overflow tube through the hole and stand up the water+oxygen chamber. Like this:

5) Fill your vessel with damp potting mix. Use a peat/perlite combo to ensure good water wicking. Add some coir if you want. Mix in a handful of organic fertilizer, mounding up the mix and compressing lightly. Don't worry if a little mix falls into the holes of your bottle.
6) Plant something--seeds or young plant starts.
For seeds: get potting mix nice and moist, use a pencil to make quarter-inch-deep circles, and drop the seeds in about half an inch apart. Lightly cover with potting mix and gently press. Cover with a plastic bag to keep moisture in until seeds sprout. And then into the sun!

For lettuce or greens starts: Poke holes with a pencil and tuck plant roots deeply, lightly pressing into potting mix to make contact. One time only (so the plants can settle in), water plants and potting mix from the top. After that, water via the fill tube, like this:
 
Looks a little droopy,
but she'll settle in

Pour some water into the fill tube now to understand how the overflow spout works--see how extra water comes out of the straw? Tilt the bowl to offload some of that water. Once your plants get established and start drinking you can add more. Lettuces and greens love cool weather, so set them outside in the sun and don't bring inside unless there's danger of frost. 

Mmm...we're already eating salads from this

Saturday, March 24, 2012

Tuesday, March 20, 2012

Homemade 2-Liter SIPs Growing Kale

Little Green Girl's homemade 2-Liter SIP in action, growing lacinato kale (plus lettuce and spinach at left). Why the tea-colored water?
I mixed a little organic fertilizer into the potting mix.

These kale leaves would be a perfect addition to the tiny BLTs they were contemplating over at Root Simple.

Friday, March 16, 2012

Let’s Make 2-Liter SIPs!

Photo: Rachel Glass

My mom and I have really been expanding our gardening knowledge lately. Though there is a lot more to learn, we have been sharing that gardening knowledge with kids and families in our community.

When we were asked to teach children at a special event sponsored by the AUA (Advocates for Urban Agriculture) and Hull House, we decided to teach a workshop on making SIPs. A SIP is a Sub Irrigated Planter. Sub meaning bottom, irrigated meaning watered, and planter meaning… well you know. So a SIP is a planter watered from the bottom.

“First the water at the bottom of the SIP is wicked or sucked up by the fabric. Then, the water comes in contact with the roots and the plant drinks the water,” I explained.


Photo: Rachel Glass

After teaching the Becker girls (above) how to make SIPs I took a quick break. When I came back to the room from my break, I found out one of the girls had taught an adult how to make a SIP all by herself!


 My mom and I invented the seed match game so people could learn what seeds go to which plants.


The Becker girls extraordinarily (unlike some other kids I’ve taught) seemed to want to learn more about gardening. I knew that because when I introduced them to the seed game they enthusiastically started to match the seeds with the pictures of plants.

After the kids constructed their SIPs, we gave them chocolate mint seedlings to plant in their new homemade planters. 


Not long after teaching kids how to make 2-liter SIPs, we taught more children to make SIPs. In this case we taught our Girl Scout troop.


 Please download and share!
Little Green Girl

SIP Instructions updated: 3.17.2012

Blow Up Your TV


Good advice...
She was a level-headed dancer on the road to alcohol
And I was just a soldier on my way to Montreal
Well she pressed her chest against me
About the time the juke box broke
Yeah, she gave me a peck on the back of the neck
And these are the words she spoke

Chorus:
Blow up your T.V. throw away your paper
Go to the country, build you a home
Plant a little garden, eat a lot of peaches
Try an find Jesus on your own

Well, I sat there at the table and I acted real naive
For I knew that topless lady had something up her sleeve
Well, she danced around the bar room and she did the hoochy-coo
Yeah she sang her song all night long, tellin' me what to do

Repeat chorus:

Well, I was young and hungry and about to leave that place
When just as I was leavin', well she looked me in the face
I said "You must know the answer."
"She said, "No but I'll give it a try."
And to this very day we've been livin' our way
And here is the reason why

We blew up our T.V. threw away our paper
Went to the country, built us a home
Had a lot of children, fed 'em on peaches
They all found Jesus on their own

Thursday, March 15, 2012

The First Spring Harvest

 
This morning I pulled back the row covers on the low tunnels and picked my first salad. Here's Mache also known as corn lettuce.


 Purple mustard greens... so beautiful!


Let the garden season begin... but I'm not putting away the Agribon frost fabric or plastic just yet!

On the Roof: Early Spring Beehive Inspection

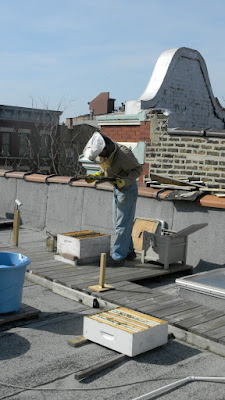
Noam came over to Art and H2's to check on their two hives.  The exceptionally warm weather we've had this year has led the bees to start their pollen (used to build bee muscles and glands) and nectar (the carbohydrate source that keeps the bees running) gathering early, and he wanted to make sure everything was ok.

He explained that, among other things, he would be looking to see that the queen(s) were laying brood--baby bees--and checking for any signs that either hive was getting full, which would cause the bees to swarm.


(Click on any picture for a larger view.)

After putting on his veil, Noam lit the smoker.

He first addressed what he guessed would be the "weaker" of the two hives; the one he thought, given its past performance, might not have made it through the winter.

After removing the top and inner cover, he scraped away the propolis holding a frame to the hive body and pulled it out. 

Not finding any in the upper body, he set it aside and checked for brood in the lower super.


Success! The queen is laying. The capped brood cells are a dull orange in color and are mostly hidden by the mass of bees in the top center of the frame.


Turning his attention to the second hive, upon taking off the cover he immediately noticed that bees were spilling out the tops of all the frames.  No doubt the queen was laying here.  Not only that, they were running out of space. Unless he added another hive body, they would fly off en mass, or swarm, in search of a larger home.

He pulled an unused medium hive body from his stores and placed 9 empty frames inside.


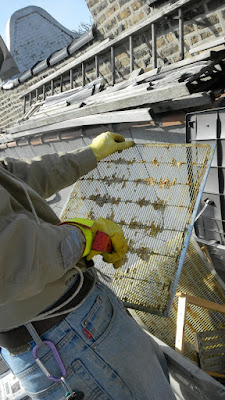
In order to prevent the queen, with its larger thorax, from migrating to the upper hive bodies, he places a "queen excluder", basically a screen, above the lower two hive bodies.  Those lower bodies are exclusively for brood.  Anything higher in the hive will contain only honey, so there is no danger of "harvesting" the queen when its time to extract honey.

Here he is scraping last seasons propolis from the exluder. 

Excluder in place, he lowers the new, empty framed, hive body in place.

Tuesday, March 13, 2012

Near 80 Degrees F in Chicago March 14, 2012?

This 7-day forecast for Chicago freaks me out, I said to Art yesterday. A whole lot of very warm highs and now-very-low lows. Those temps are about a month early.

And he said: You're complaining about an extended growing season?

Hmmm. He had a point.
Hurry hurry off to Bruce's to pick up the 3-inch seedlings (above) he's been tending under lights. An almost-too-warm-for-cool-weather-greens world awaits them. I put them in front of the open windows in south sun to buck up a little. 


Today, on a day that feels like May, I recharged an Earthbox from last year, removing the top layer of potting mix and fertilizer and refreshing both....


...in order to plant the sprouted pea seeds I started in some compost Feb 20 (check out those healthy roots).
 

People always ask what fertilizer we use
for spring plantings. This one.
In our second adopted Earthbox, lettuces.
Here they are, looking a little droopy in the hot sun, but they should perk up.

Are we ready for this year's weather? Who knows where's it's heading. Art screwed in the windbreaks on the cool-weather greens run to guard against infant-greens ravaging spring winds. Just in case.

Lunch break:
salad from the raised bed (top picture)

Taken out of context, 78 degrees on the roof made for a beautiful day.